
How to Automate End-to-End UI Testing With Cypress: A Detailed Step-by-Step Guide
The engineering team at Shipsy shares a detailed tutorial on automating front-end UI testing with Cypress in a rapid release environment.
Testing in a rapid release environment can easily become an incrementally expensive task. While a minor change can break the previously authored tests, testing the static components for high-quality releases also calls for repetitive testing of components that were not changed at all.
Hence, test automation!
Automating end-to-end UI testing significantly increases the test coverage rates and facilitates scaling of testing operations by reusing the test scripts created earlier. Automated testing makes test execution faster, and more accurate via efficient and well-maintained test scripts.
However, for test automation, the idea is to look for a reliable and intuitive platform that can be used by both the test engineers and developers for extended benefits. One such platform is Cypress, which allows testing engineers and developers to create web test automation scripts in JS.
Here is a detailed step-by-step tutorial from us, at Shipsy, for front-end test automation with Cypress. The tutorial starts with system requirements, and Cypress installation and also features code snippets from a test demo for a better understanding.
Let us get started with the basics!
Choice of Platform: Why Cypress?
Cypress is an open-source UI automation tool that can be used for integration and end-to-end testing automation. While other testing automation tools like Selenium sit on the compatibility layer (this layer sits between the browser and the Selenium testing framework), Cypress sits right inside the browser and performs all the tasks there.
This is possible because the test runner of Cypress injects the code into the browser and gets the information in and out of it. This, in turn, is possible because Cypress is built on Node.js and uses JavaScript for writing tests.
Further, the Mocha and Chai libraries are built-in and the platform is fast to set up, install and execute.
Finally, the software automatically takes snapshots as the tests run. The user can hover over each command in the command log to see exactly what happened in each step. They can also check the video playback of every test execution for more visibility into testing.
The same goes for Puppeteer. When it comes to quick testing, Puppeteer is great but if you have to test an entire application (which is generally the case), Cypress emerges as a reliable, robust, and resilient platform that offers impeccable performance and results.
The reasons for the huge difference between the performance lies in the fact that Puppeteer is a library, and Cypress is a solid end-to-end testing platform for writing and automating UI tests. Further, the team has done an amazing job with the documentation.
Getting Started: Setting Cypress
As Cypress sits in the browser, it allows much more control over DOM in general, because there is not too much “to-and-fro” among layers or drivers.
Now, one might think that the native side of events might suffer because of this, but Cypress offers repositories for native events.
Next, we share the step-wise process of setting up Cypress.
1. Download NodeJS
Install a version of NodeJS that is not older than NodeJS12.
2. Setting Cypress
It is a good practice to place the files for integration, unit testing, and end-to-end testing in the project folder for which tests are being written.
Now one might ask - “Why?”
As there is no code sharing among the files, Cypress can be kept apart from the main project technically. However, when we are using CI/CD for automatic online deployment, having all the tests in the same repository makes test execution easier and faster.
3. Initializing Cypress Test Directory
We can initialize “npm project” in two ways:
- Using the Yarn package manager
- Using the
npmpackage manager (a more popular option)
For this, we run the following command:
npm init --
This completes the initialization of a package JSON file that manages the tendencies, scripts, and execution of the project that is being initialized via Yarn or npm.
4. Install Cypress
Next, install Cypress and download the Cypress binary:
npm install cypress –save-dev
While Cypress has its own full browser that ships with an Electron-based browser (a basic version of Chromium), any other browser can also be used.
5. Run Cypress Test Runner
Next, run the command:
npx Cypress open
This will open the Cypress test runner that has 5 folders:
- Fixtures
- Integration
- Plugins
- Support
- Video
Once the Cypress launchpad is opened, you can start writing scripts. Scripts can be run in headless mode as well via this command:
npx Cypress run -headless
This mode is required when we are running multiple tests in a CI/CD environment (a display-less environment where GUI is not there).
This is another advantage of using Cypress - headless testing can be automated. Next, we discuss the various folders in the Cypress test runner.
Cypress comes with a comprehensive testing example file. You can check that out before writing your first test.
Now, that’s everything that you need to know to start using Cypress but for a better understanding, we are going to discuss the Cypress framework in detail and explore the same with a detailed test case in the following sections.
Cypress Folders
1. Fixtures
The Fixture folder contains the dummy data that we wish to use in testing. This comes in handy when APIs are too expensive to call or APIs forbid access via the public internet.
In such cases, we can move the data from that particular API into a JSON file in the fixtures folder and conveniently get data for testing.
Now, this brings us to another question - “Why store this JSON file in fixtures only, and not store this outside in any other folder?”
We do this because Cypress offers out-of-the-box support for using these files statically and no manual data import is required for the JSON data folder. Hence, data imports become effortless and easier.
2. Integrations
This folder is extremely important for testing as it contains all the test or spec or specification files. We can create multiple folders in the integrations folder for test file categorization.
These test files contain the test description in the describe method. Every test file should ideally have only one describe, which can have multiple tests in it.
Hence, the describe method can be understood as a suite of tests, and all these tests are individually explained under this method.
3. Plugins
Plugins are used to extend the functionality of Cypress, such as in cases where we need oAuth from browsers, which is a tricky process.
4. Support
This folder allows the user to create reusable code and custom commands. This becomes of crucial importance in the cases of long codes, such as user login.
The code in the support folder can be called again and again as and when required.
5. Video
This folder contains the video playbacks of all the test execution. These videos can be played by the user to identify any problem or issue with test runs.
This is important in a CI/CD environment where test logs might not offer an in-depth understanding of the test results.
Next, we share a real-time demonstration of automating testing with Cypress and some results of how this automation can speed up the testing without affecting release quality.
UI Testing Automation with Cypress - Implementation Snippets
The first step is to create a Cypress framework for automating UI testing. This is covered in detail in the next sections.
1. Creating A Page Object Model
Every page has specific DOM elements that are required for automation and are written in one place.
Now, for creating a page object model, we have to create a separate JS file for each web page. These JS files have the object elements of these pages that are used in DOM test cases.
In Cypress, this looks like this:
class page_customer {

    page_user_id() {
        return cy.get("#username")
    }

    page_password() {
        return cy.get("#password")
    }

    page_login() {
        return cy.get('.submit-button')
    }
The page objects are now visible and accessible from the page object folder, and there is no need to access the codebase every time in case we need to change or access these page objects.
2. Custom Functions
In the next step, we have to create custom functions for specific tasks, such as consignment creation that requires the sender and destination details, etc.
import page_consignment from '../../PageObjects/pageObjects_express/page_consignment'
const page_consignment1 = new page_consignment()
var first_mile_trip
const first_mile_file = 'cypress/fixtures/fixtures_express/fixtures_firstmile.json'


class custom_consignment {

    custom_opencrm() {
        page_consignment1.page_menu_button().click()
        page_consignment1.page_crm_menu().click({force:true})
        page_consignment1.page_crm().click({force:true})
    }
So, each JS file now has corresponding custom functions related to specific tasks, and these functions can be called as and when required separately in multiple test cases.
The data for these custom functions comes from fixtures and environment settings, which we are going to explain in the coming sections. Basically, all the data comes from outside the main codebase which makes testing highly scalable and the codebase more secure.
3. Cucumber Integration (BDD Feature Integration)
Cucumber is one of the Gherkin-based tools which supports and helps in Behavior Driven Development (BDD). This tool offers the capability to write our tests in a syntax similar to English.
Feature File is the entry point to the Cucumber tests of your framework. It is a file where you will write your tests or acceptance criteria in the Descriptive Gherkin language (Like English). A feature file can include one or many scenarios that are in the form of Given-When-Then format.
Feature: CREATION OF DOCUMENT TYPE DOMESTIC CONSIGNMENT AND PICK UP REQUEST FROM CUSTOMER PORTAL.

Feature Description
    Creation "Domestic Consignment" and "Pick up Request" from customer portal.
    Complete pick up to "Pick up schedule" by rider app.


        Scenario: Domestic Consignment should be created after enter all mandatory fields like Source Address,Delivery Address,item type, weight, service type etc
            Given Customer Portal Url,Customer User id,Customer Password ,Submit button of Customer Portal
             When Click on Consignment button
              And Click on the Single Consignment button
              And Please select the invoice number
              And Enter the source address
              And select source address from saves address option
              And Enter the delivery address
              And select delivery address from saves address option
              And select option document type
              And Enter the weight
              And Select the service type
              And Click on Upload details button
             Then Consignment should be created with success message
              And Extract the Consignment Number as variable to use in another cases

        Scenario: After Create Consignment, Its should be displayed in "Search" page with status "Soft Data Upload" after run the scheduler API.
            Given API AUTOMATION-API url, headers of scheduler API
             When API AUTOMATION-hit the scheduler API
              And  Enter the consignment reference number in search text box
              And click on refresh
             Then consignment number should be displayed in search page
              And Status of consignment should be "Soft Data Upload"
Step Definition is a small piece of code with a design pattern attached to it. The cucumber will execute the code when it sees a Gherkin Step mentioned in the feature file.
Given('Consignment creation url, negative Length, width, height', () => {
    api_consignment_url = env_dtdc_data.customer_portal_api_url + resources_consignment1.resources_consignment_create()
    cy.log(" Consignment Creation API URL is : " + api_consignment_url )
    pieces = fixtures_customer.Dimensions[1]
    cy.log("Number of pieces is : " + pieces)
    length = fixtures_customer.Dimensions[0]
    cy.log("Length is : " + length)
    width = fixtures_customer.Dimensions[1]
    cy.log("Width is : " + width)
    height = fixtures_customer.Dimensions[1]
    cy.log("Height is : " + height)
    service_type = fixtures_customer.service_type[0]
    cy.log("Service type is : " + service_type)
    customer_code = env_dtdc_data.customer_user_code
    cy.log("Customer Code is : " + customer_code)
    customer_user_id = env_dtdc_data.customer_id
    cy.log("Customer User ID is : " + customer_user_id )
    customer_access_token = env_dtdc_data.consignment_access_token
    cy.log("customer_access_token is : " + customer_access_token)

})
4. How to integrate Cucumber with Cypress?
Run the following command:
npm install cypress-cucumber-preprocessor
Once these two packages are installed, we call the cucumber-preprocessor next, in the plug-in>>index.js file:
module.exports = (on, config) => {
// `on` is used to hook into various events Cypress emits
// `config` is the resolved Cypress config
}
const cucumber = require('cypress-cucumber-preprocessor').default
module.exports = (on, config) => {
on('file:preprocessor', cucumber())
}
Next, we bind the step definitions by adding the below command in the packages.json file:
"cypress-cucumber-preprocessor": {
"nonGlobalStepDefinitions": true
}
The next set of configuration changes are in the cypress.json file:
{
"testFiles": "**/*.{feature,features}"
}
5. How to Write Cucumber BDD Tests in the Cypress Framework?
Feature file is created with .feature extension under the integration folder.
Let’s create a feature file with a scenario in it.
Create a feature file named “cucumber.feature” :
Feature: Customer Portal login
Feature Description
Scenario: Log in the customer portal
Given Url, user id and password of the customer portal.
When click on login after enter all above details.
Then Customer portal should be opened successfully.
Next, we create another folder under integration with the same name of the feature file and add one js file to write step definitions here:
We need to import {Given, When Then} from cypress-cucumber-preprocessor/steps package :
import {Given, When, Then} from "cypress-cucumber-preprocessor/steps"
In the above example, we have an integration feature file with different projects. There are different feature files for each project as well and these feature files have different test scenarios written in basic English.
6. Step Definitions for Cucumber
The code for these features is written in the step definitions folder that has step.express.js files for each step.
Given('Consignment creation page and required details.', () => {

     customer = Cypress.env("express_customer_code")
     cy.log("customer code is : " + customer)
     custom_consignment1.custom_opencrm()
     custom_crm1.custom_add_consignment()
     destination_name = Cypress.env("express_destination_details_name")
     destination_mobile = Cypress.env("express_destination_details_mobile")
     destination_address = Cypress.env("express_destination_address")
     destination_city = Cypress.env("express_destination_city")
     destination_state = Cypress.env("express_destination_state")
     destination_pincode = Cypress.env("express_destination_pin_code")
     destination_country = Cypress.env("express_destination_country")
     sender_name = Cypress.env('express_origin_details_name')
     sender_phone = Cypress.env('express_origin_details_mobile')
     sender_city = Cypress.env('express_origin_city')
     sender_state = Cypress.env('express_origin_state')
     sender_pincode = Cypress.env('express_sender-pin_code')
     sender_country = Cypress.env('express_origin_country')


})

When('Enter all the values and press submit.', () => {

     custom_crm1.custom_account(customer)
     custom_crm1.custom_destination_details(destination_name, destination_mobile, destination_address, destination_city, destination_state, destination_pincode, destination_country)
     custom_crm1.custom_sender_details(sender_name, sender_phone, sender_city, sender_state, sender_pincode, sender_country)
     custom_crm1.custom_weight(fixture_crm.weight[0])
     custom_crm1.custom_service(fixture_crm.service[0])
     custom_crm1.custom_upload_details()
     cy.wait(10000)

})
Then('Status of consignment should be "Pickup Awaited"', () => {
     custom_consignment1.custom_verify_table_status(fixtures_consignment_page.header_value[0])
})
This way, all the changes are made outside the codebase and the data can be accessed or modified without accessing the main application code.
7. Fixtures
Cypress provides a directory named Fixtures, which stores various Json files. These JSON files can store the test data, Which can be read by multiple tests. We store test data in the form of key values, which we can access in the test scripts.
Take a quick look at the following snippet for a better understanding:
{
    "bag_status": ["Created", "Sealed", "In Transit", "Inscan At Hub", "Debagged"]
}
These values are compared with the values in the step definitions:
Given('Bag number and Destination hub', () => {
    cy.random('BAG').then((number) => {
        bag_number = number
        cy.log("Bag Number is  :" + bag_number)
    })
    destination_hub = Cypress.env('express_destination_hub_code')
    cy.log(" Destination Hub is : " + destination_hub)
})

When('Click on Hub Code, Actions and Create Bag button', () => {
    custom_bag1.custom_actions_btn()
    custom_bag1.custom_create_bag_btn()
    cy.wait(2000)
})
If these values match, the test cases are successfully passed, otherwise, the test cases fail.
API Testing Automation
For API testing automation our Cypress framework has four parts:
1. Headers
All the API headers are defined in this folder and the key values are passed via the step definitions folder, as explained above.
Take a quick look at the screenshot for a better understanding:

2. Payloads
All the API payloads are defined in the form of payload functions in this folder.
Here is a screenshot of the API payload folder:
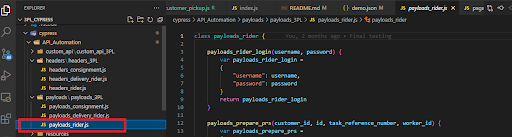
The code snippet for the highlighted folder is also shared below for a better understanding.
class payloads_rider {

    payloads_rider_login(username, password) {
        var payloads_rider_login =
        {
            "username": username,
            "password": password
        }
        return payloads_rider_login
    }
}
export default payloads_rider;
3. Resources
All the resources attached to the API base URLs are defined in this class.
Here is a screenshot of the Resources folder from the Cypress framework:
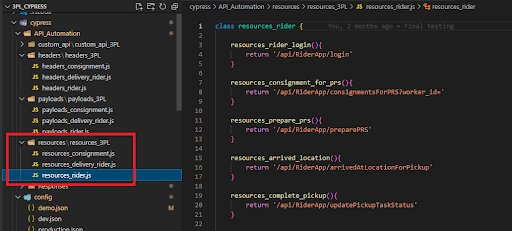
The code snippet is as follows:
class resources_rider {

    resources_rider_login(){
        return '/api/RiderApp/login'
    }

    resources_consignment_for_prs(){
        return '/api/RiderApp/consignmentsForPRS?worker_id='
    }

    resources_prepare_prs(){
        return '/api/RiderApp/preparePRS'
    }

    resources_arrived_location(){
        return '/api/RiderApp/arrivedAtLocationForPickup'
    }

    resources_complete_pickup(){
        return '/api/RiderApp/updatePickupTaskStatus'
    }

}

export default resources_rider
4. Custom-API Functions
In the custom API folder, all the functions on headers, payloads, resources, etc are written and executed.
This is how the folder looks like:
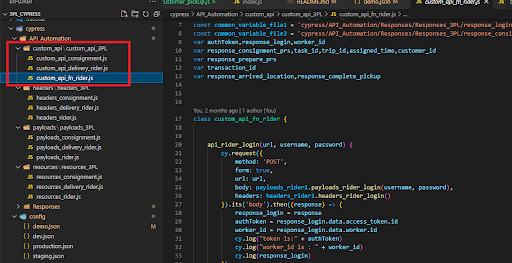
The code snippet for the specific folder is also shared below:
class custom_api_fn_rider {


    api_rider_login(url, username, password) {
        cy.request({
            method: 'POST',
            form: true,
            url: url,
            body: payloads_rider1.payloads_rider_login(username, password),
            headers: headers_rider1.headers_rider_login()
        }).its('body').then((response) => {
            response_login = response
            authToken = response_login.data.access_token.id
            worker_id = response_login.data.worker.id
            cy.log("token is:" + authToken)
            cy.log("worker_id is : " + worker_id)
            cy.log(response_login)
        })
    }
The rest of the process resembles the ones discussed for UI testing automation.
A sample step definition call for API testing automation is shown below:
Given('API Automation - URL, UserID and Password of Rider App',  () => {
    api_login_url = env_dtdc_data .api_rider_url + resources_rider1.resources_rider_login()
    api_rider_username = env_dtdc_data.api_rider_username
    api_rider_password = env_dtdc_data .api_rider_password
})

When('API Automation -Enter User ID, password and press Submit',  () => {
     api_rider1.api_rider_login(api_login_url, api_rider_username, api_rider_password)
})

When('API Automation -write the auth token from api response as json data',  () => {
     api_rider1.api_rider_login_data_generate()
})
Next, we discuss some other components of the Cypress framework.
1. Environment Settings
We have different types of environments, such as Dev environment, Demo environment, Production environment, etc.
Now, we did the environment settings such that the environment or script data for all these environments are written outside the main codebase so that we don't have to make any changes in the existing codebase in case of future environment data updates.
For this, we have used a separate config file that has multiple JSON files for each environment. The test scripts for each environment get the data from these JSON files for every specific command.
2. Common Functions in Command
The Support folder in the Cypress framework has a command.js file that has all the common functions that can be called anytime and anywhere as per requirements via the step definitions file.
Take a quick look at the screenshot that highlights the folder and file:
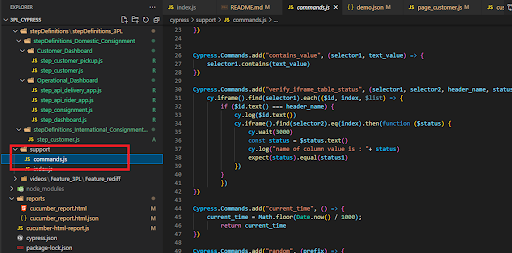
The code snippet for this specific file is shared below:
Cypress.Commands.add("verify_table_status", (selector1,selector2,header_name,header_value) => {
    cy.get(selector1).each(($id, index, $list) => {
        if ($id.text() === header_name) {
            cy.log($id.text())
            cy.get(selector2).eq(index).then(function ($status) {
               const status = $status.text()
               cy.log("header_value is :" +status)
               expect(status).equal(header_value)
           })
        }
        })
})
3. Reports
Another interesting feature of our UI testing automation framework is the reporting. These reports are generated for test scripts that we run. All these reports are extremely intuitive and offer actionable insights in a user-friendly manner because of our BDT framework in testing automation.
Here are a few snapshots of the reports for a better understanding:
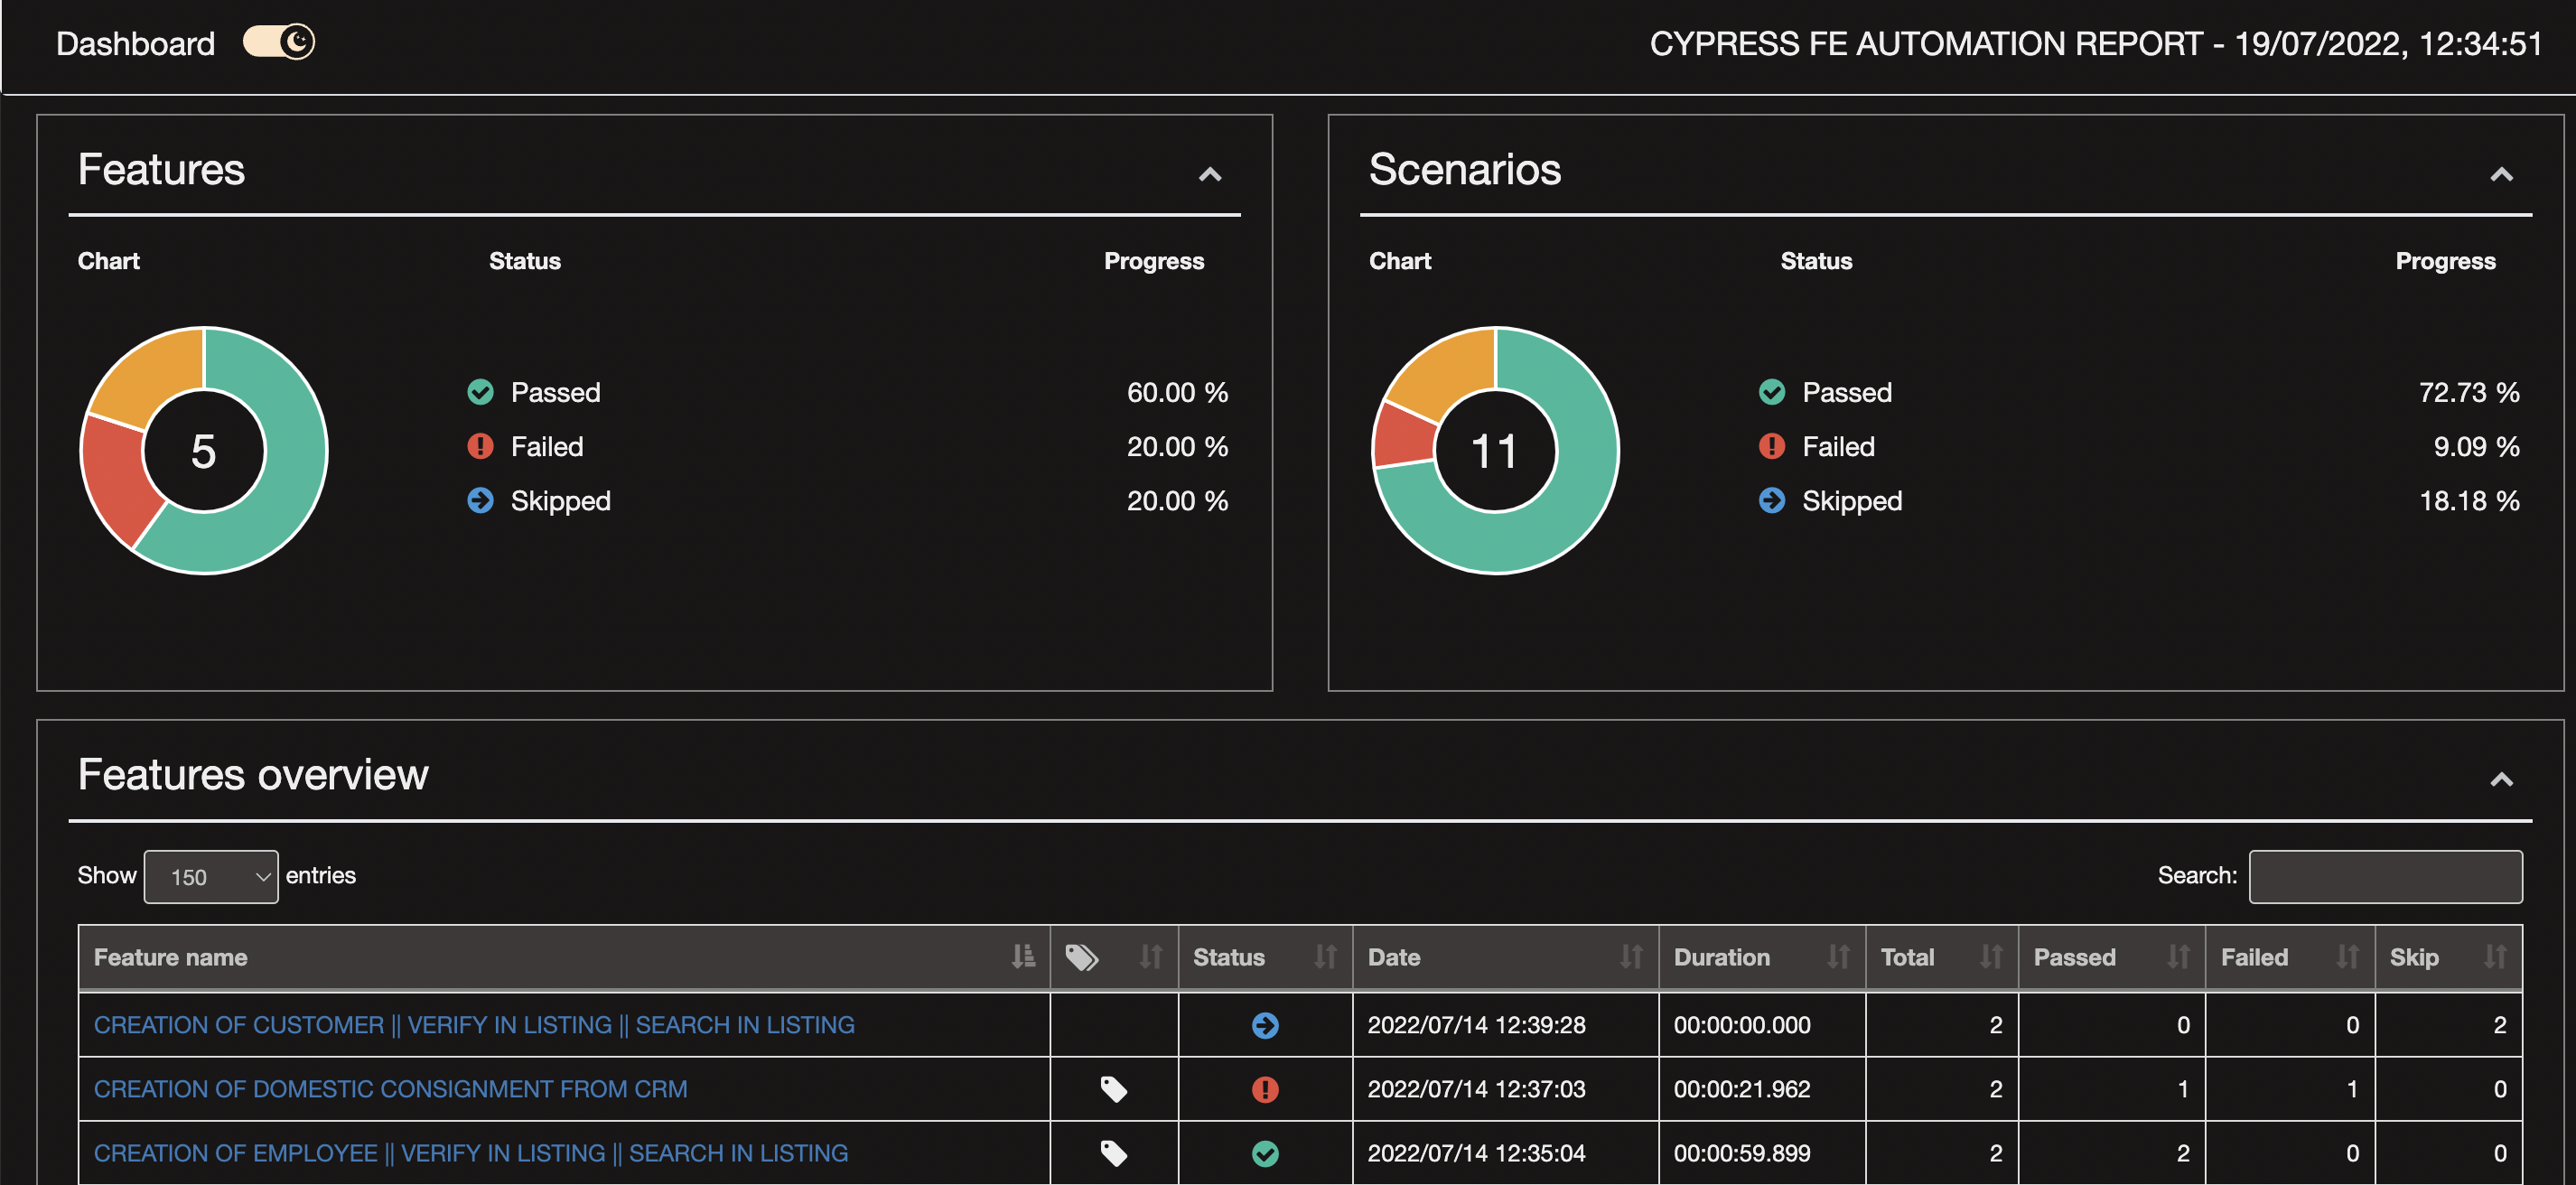
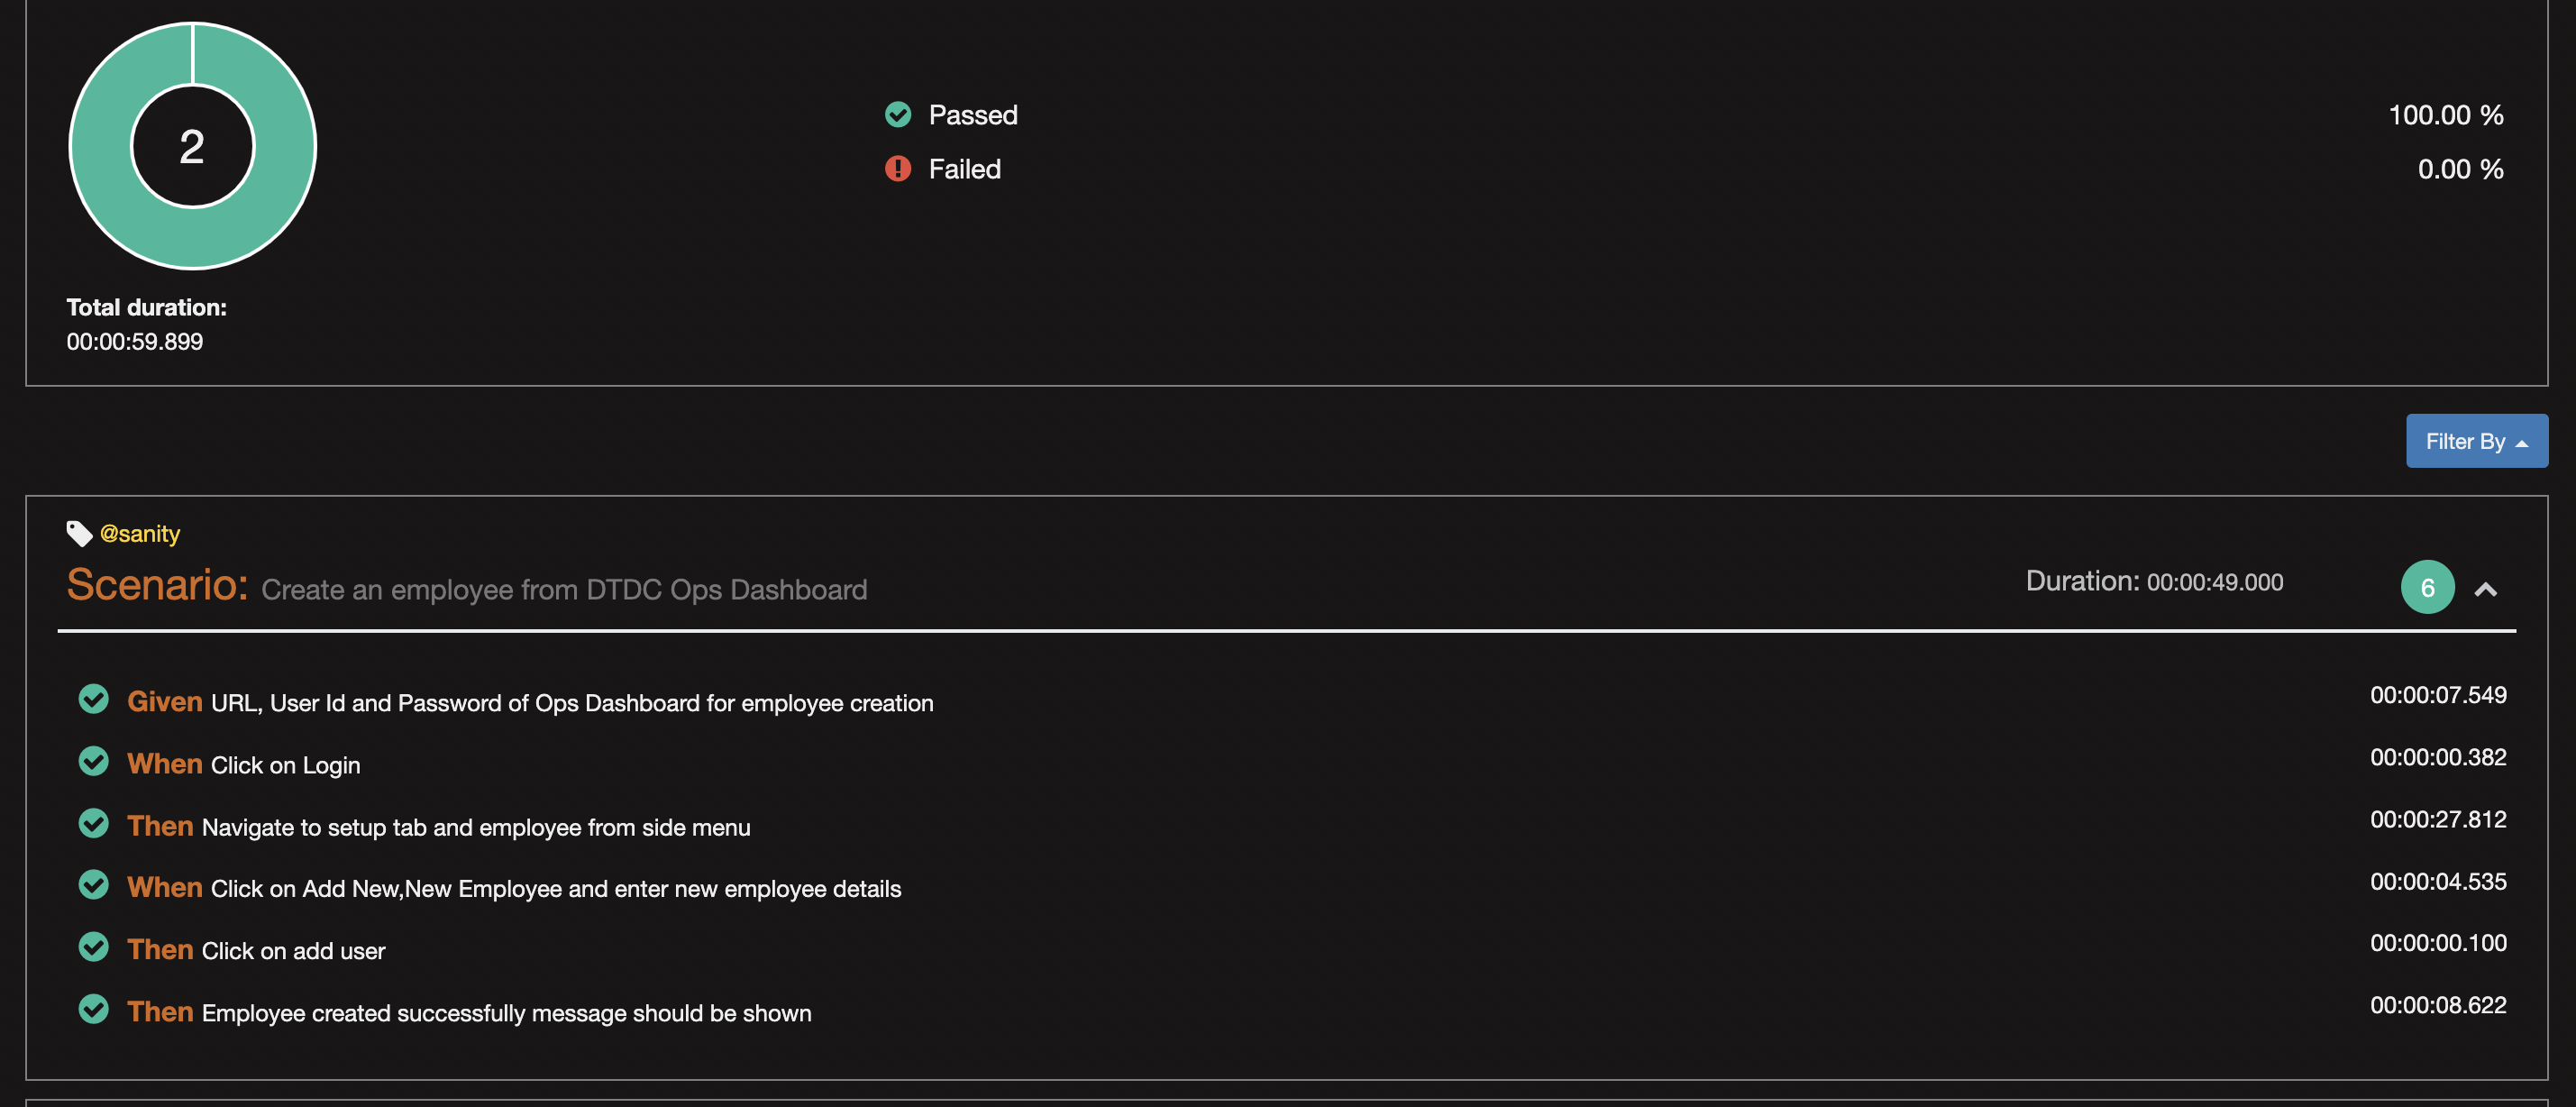
These reports show the number of test cases that are passed and failed. It also shows the time taken for a test case to get executed.
So, this is how UI testing automation can be done with Cypress.
Now, give this a try, and let’s get in touch in the comments section to share the experience!
At Shipsy, we have a highly agile and innovative tech community of developers committed to making logistics and supply chain processes better, sharper, and more efficient with code that gets better every day!
If you wish to be a part of Team Shipsy, please visit our Careers Page.
Acknowledgments and Contributions
As an effort towards consistent learning and skill development, we have regular “Tech-A-Break” sessions at Shipsy where team members exchange notes on specific ideas and topics.
This write-up stems from a recent Tech-A-Break session on front-end UI test automation, helmed by Swatantra Srivastava.