Code-Free Label Design: Arresting Redundancies, “One at a Time”
Shipsy's Dev team creates a code-free label generator to reduce customer onboarding time and scale the label generation process.
At Shipsy, we track, deliver, and route millions of consignments across the globe, daily.
Hence, redundancies, in any form and in any business vertical, can come with huge repercussions.
However, when we are operating at scale, redundancies have the tendency to not only creep in but also evolve gradually over time.
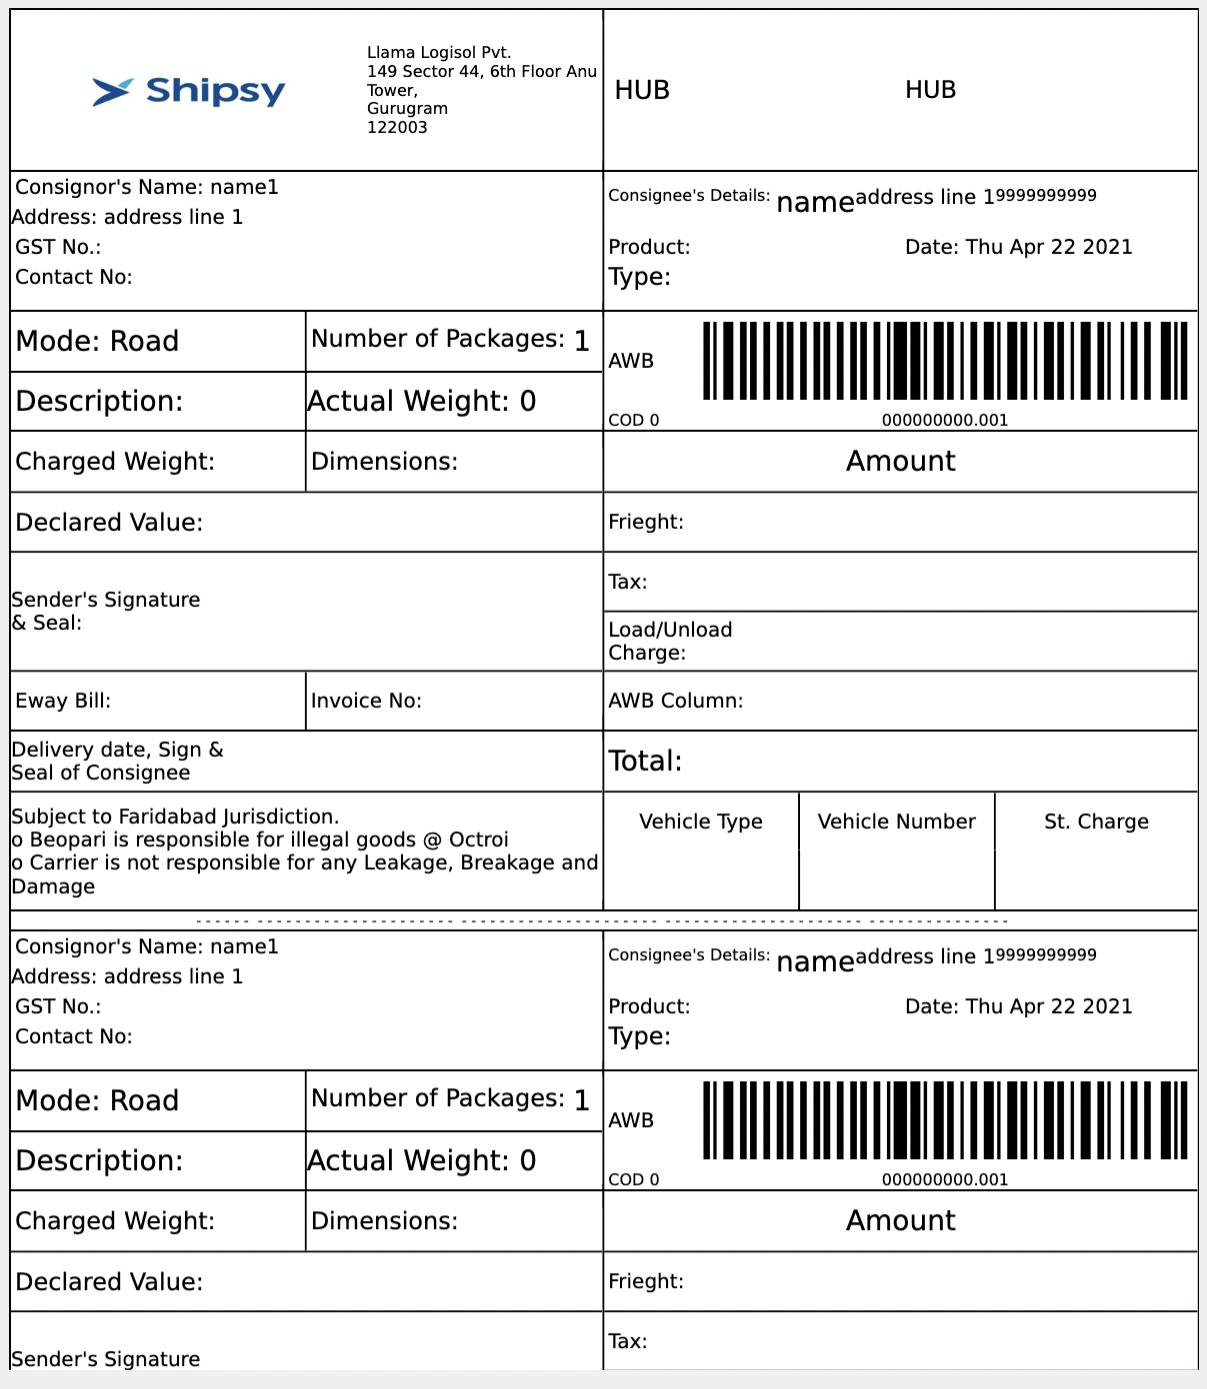
One such redundancy that we encountered was consignment label generation. Every customer had different label design specifications, which is why every label required individual creation and ultimately individual coding.
For example, every field and information present on this consignment label is positioned and rendered via code:
Source: Shipsy
This meant that a lot of code was redundant and repetitive. The process lacked resource efficiency and consumed a lot of time and effort as well.
Here is how we overcame this redundancy by making the entire process code-free.
Problem Statement - Redundant and Inefficient Label Generation Process
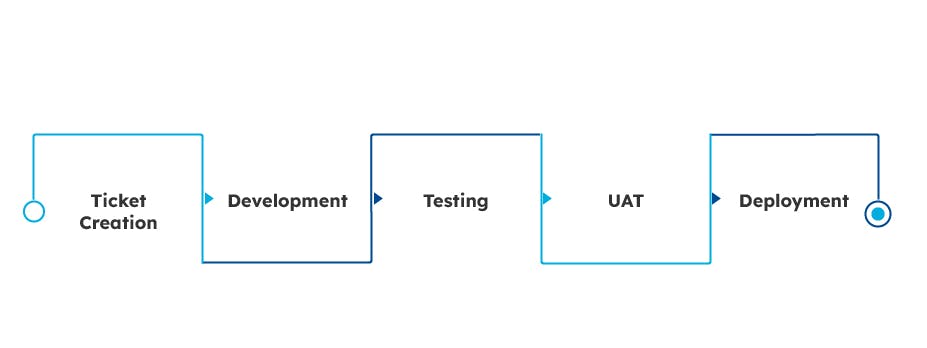
Previously, the label generation process included the following 5 steps:
Source: Shipsy
Previously, every label generation began with a ticket generation process, followed by coding as per the client provided specifications. Next, the label was tested by actually printing on paper to ensure that all the content is appearing the correct way.
Finally, the label entered the UAT (User Acceptance Testing).
Hence, the process was time-consuming, tedious, and involved a lot of repetitive coding.
Our Objective
We wanted to make our label generation entirely code-free, and create a dashboard for label generation so that:
- Anyone, including our clients, can generate labels directly from the dashboard in an entirely code-free manner
- The previously generated labels can be stored for future use with minimum changes
- The label generation process becomes more time and resource-efficient
- There is no need for QA, UAT, and actual print-testing of the labels
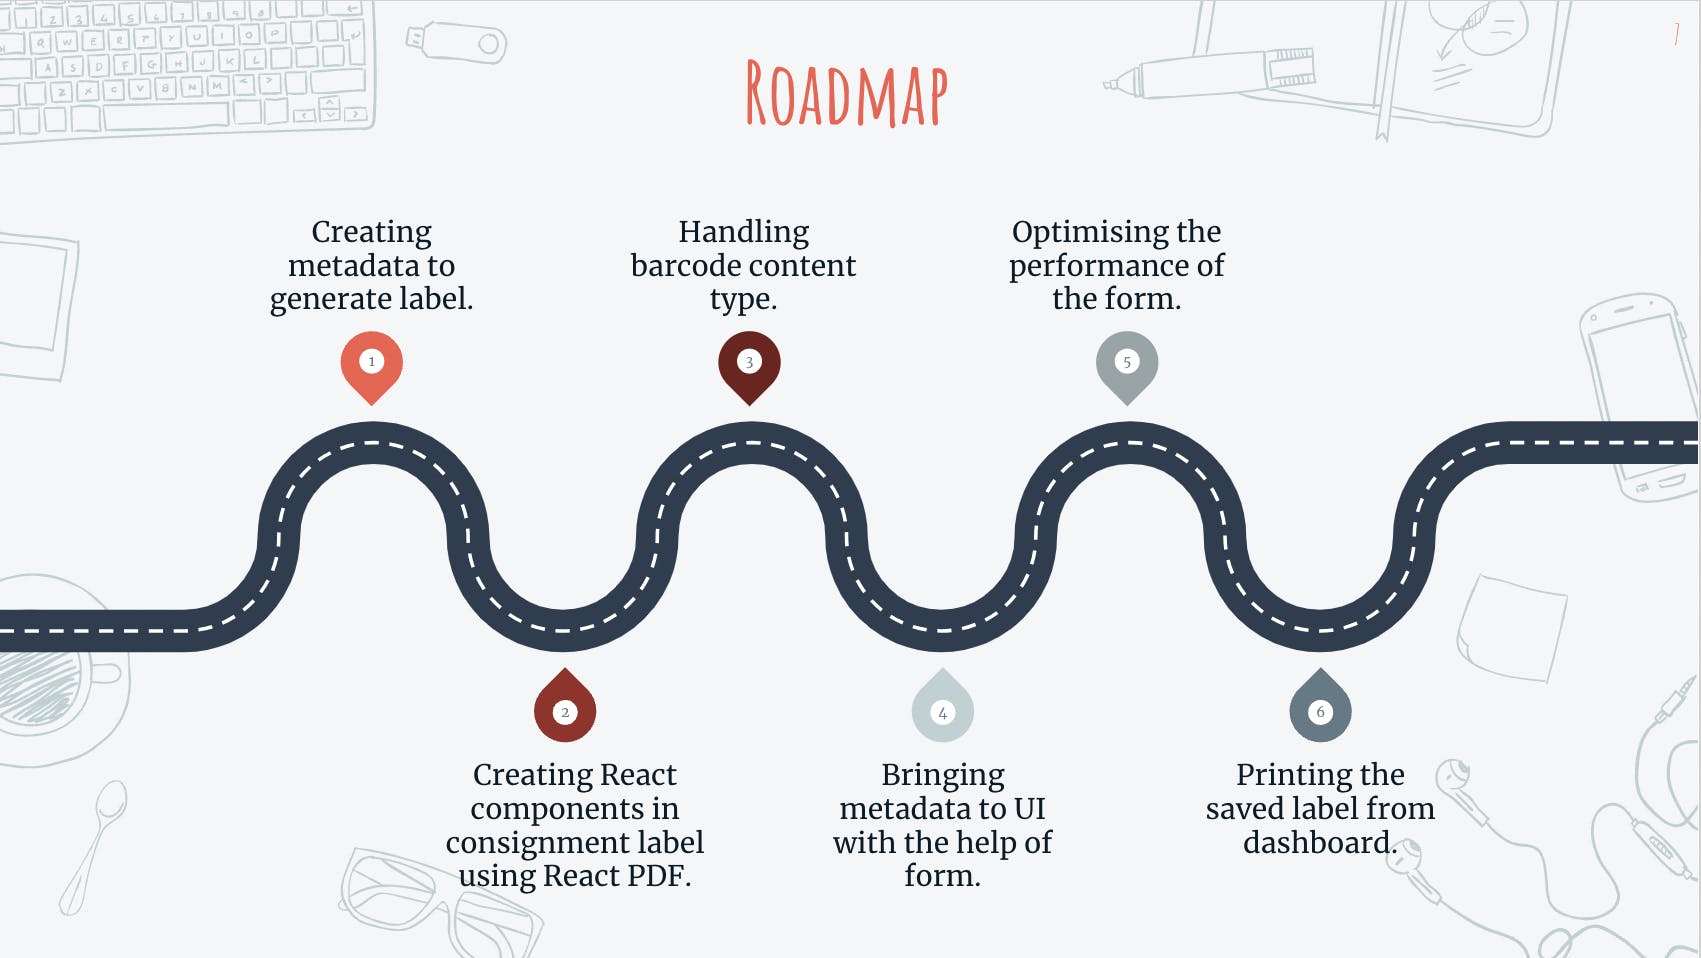
Here is the roadmap for our endeavor:
Source: Shipsy
Next, we share a step-wise walkthrough of the process that helped us make our label generation code-free, resource-efficient, and redundancy-free.
Solution: Code-Free Label Generation
Step 1 - Creating the Metadata to Generate Label
As a label is a grid with an array of rows, the metadata to create a label must have the following:
- Page properties - page size and page arrangement
- Components - rows, cells, text, image, barcode
A snapshot of basic metadata is shared below:
{
 "padding": "0px 0px 0px 0px",
 "orientation": "portrait",
 "dimension_code": "A6",
 "label_arrangement_code": "1x1",
 "label_vertical_spacing": 0,
 "label_horizontal_spacing": 0,
 "rows_metadata": [
   {
     "cells": [
       {
         "type": "content",
         "style": {
           "width": "100%",
           "padding": "0px 0px 0px 0px"
         },
         "content": [
           {
             "type": "text",
             "field": "service_type_id",
             "style": {
               "fontSize": "10"
             },
             "contentType": "dynamic_field_code",
             "dynamic_field_code": "service_type_id"
           }
         ],
         "widthType": "%",
         "contentStyle": {
           "justifyContent": "center"
         }
       }
     ],
     "style": {
       "height": 12
     }
   },
   {
     "cells": [
       {
         "type": "content",
         "style": {
           "width": "100%",
           "padding": "0px 10px 0px 10px"
         },
         "content": [
           {
             "type": "barcode",
             "field": "reference_number",
             "contentType": "static_value",
             "static_value": "reference_number"
           }
         ],
         "widthType": "%",
         "contentStyle": {
           "justifyContent": "center"
         }
       }
     ],
     "style": {
       "height": 65,
       "borderTop": false
     }
   }
 ]
}
Some content, such as company image, logo, barcode, etc. is fetched dynamically from the internal server, while the static content, such as shipment details, address, etc can be filled manually as well, as shown below:
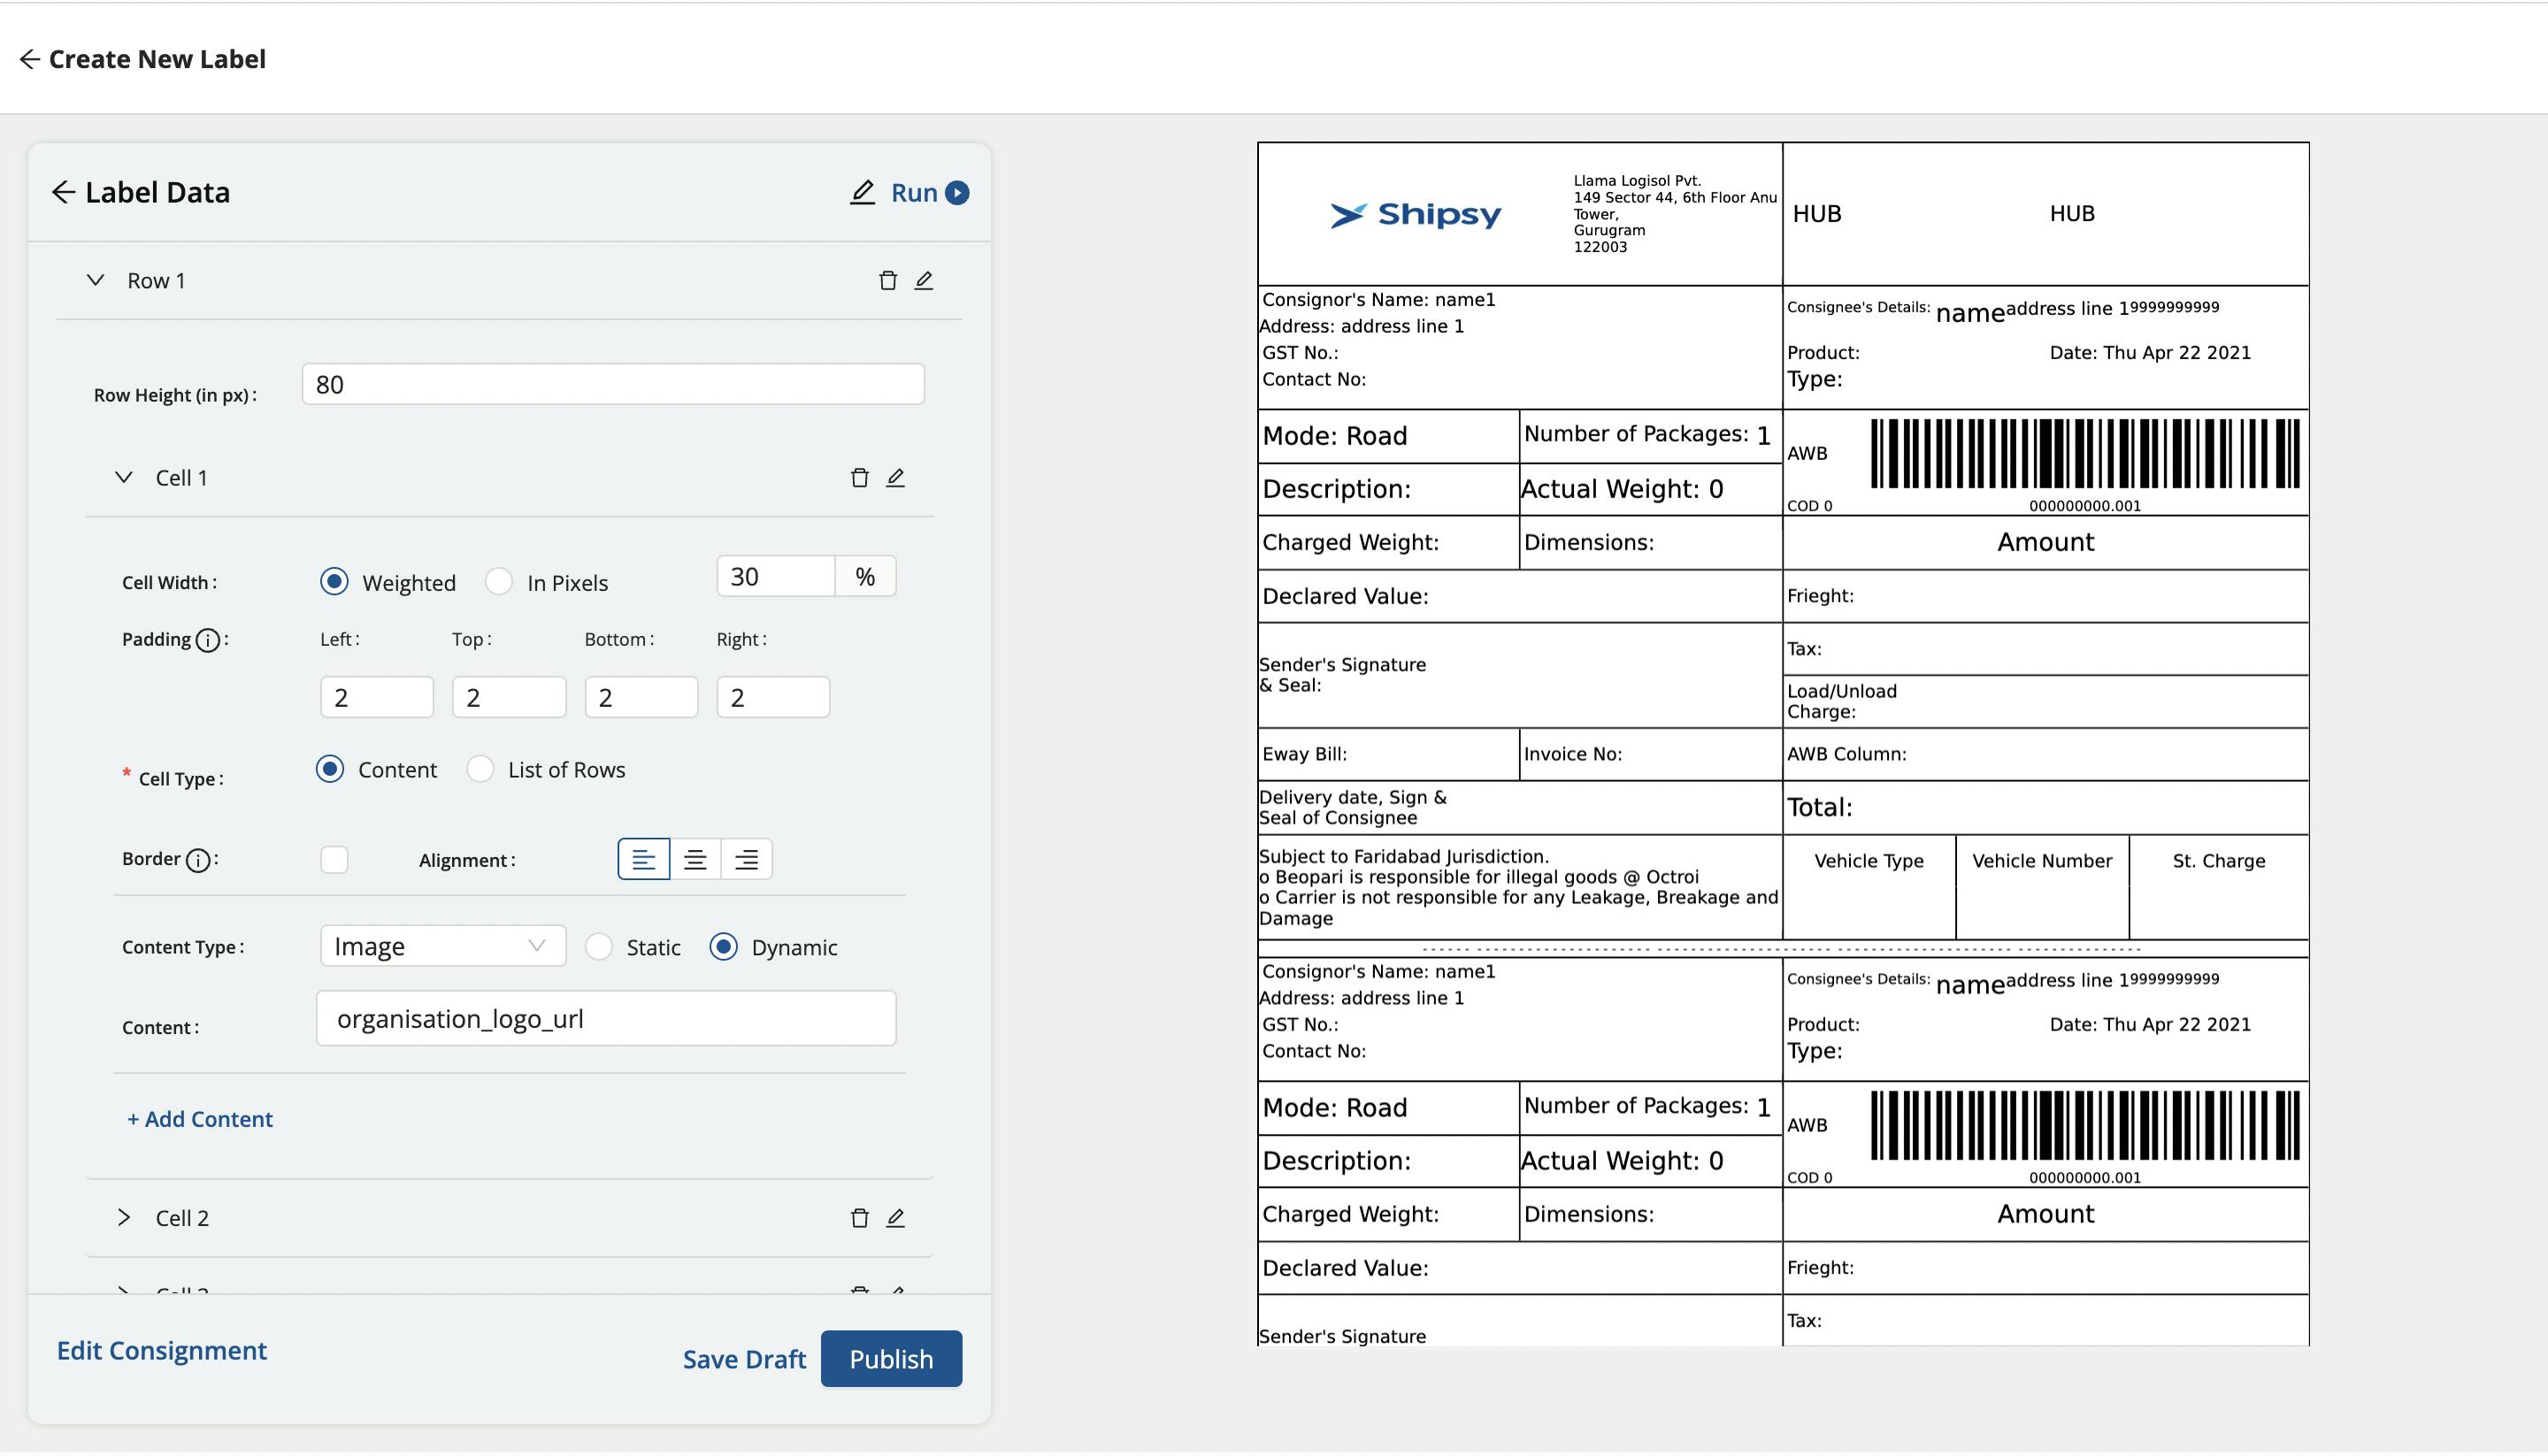
Source: Shipsy
Step 2: Making UI From Metadata
We used the React-PDF library to render the primitive React components in a PDF.
Hence, the components can be returned as a Doc file, a blog, a series of PDFs, etc.
We wrote our own components on top of this React-PDF library, which can be iterated over our metadata to generate labels in a code-free manner.
This looks like regular React components and has properties that contain consignment data and metadata.
Step 3: Handling Barcodes
We were already using a Lambda function for barcodes that we have used here as well.
As the barcode is a dynamic consignment property, its generation process cannot be hard-coded. Hence, we have used a Unique Identifier (UUID) map that combines consignment data and metadata.
This way, the barcodes that are rendered from the consignment data are attached to the label at the time of final label rendering.
As the PDF rendering is a synchronous process and barcode generation from the Lambda function is asynchronous, it is important to get the barcode before rendering the PDF via React-PDF.
Step 4: Bringing Metadata to UI
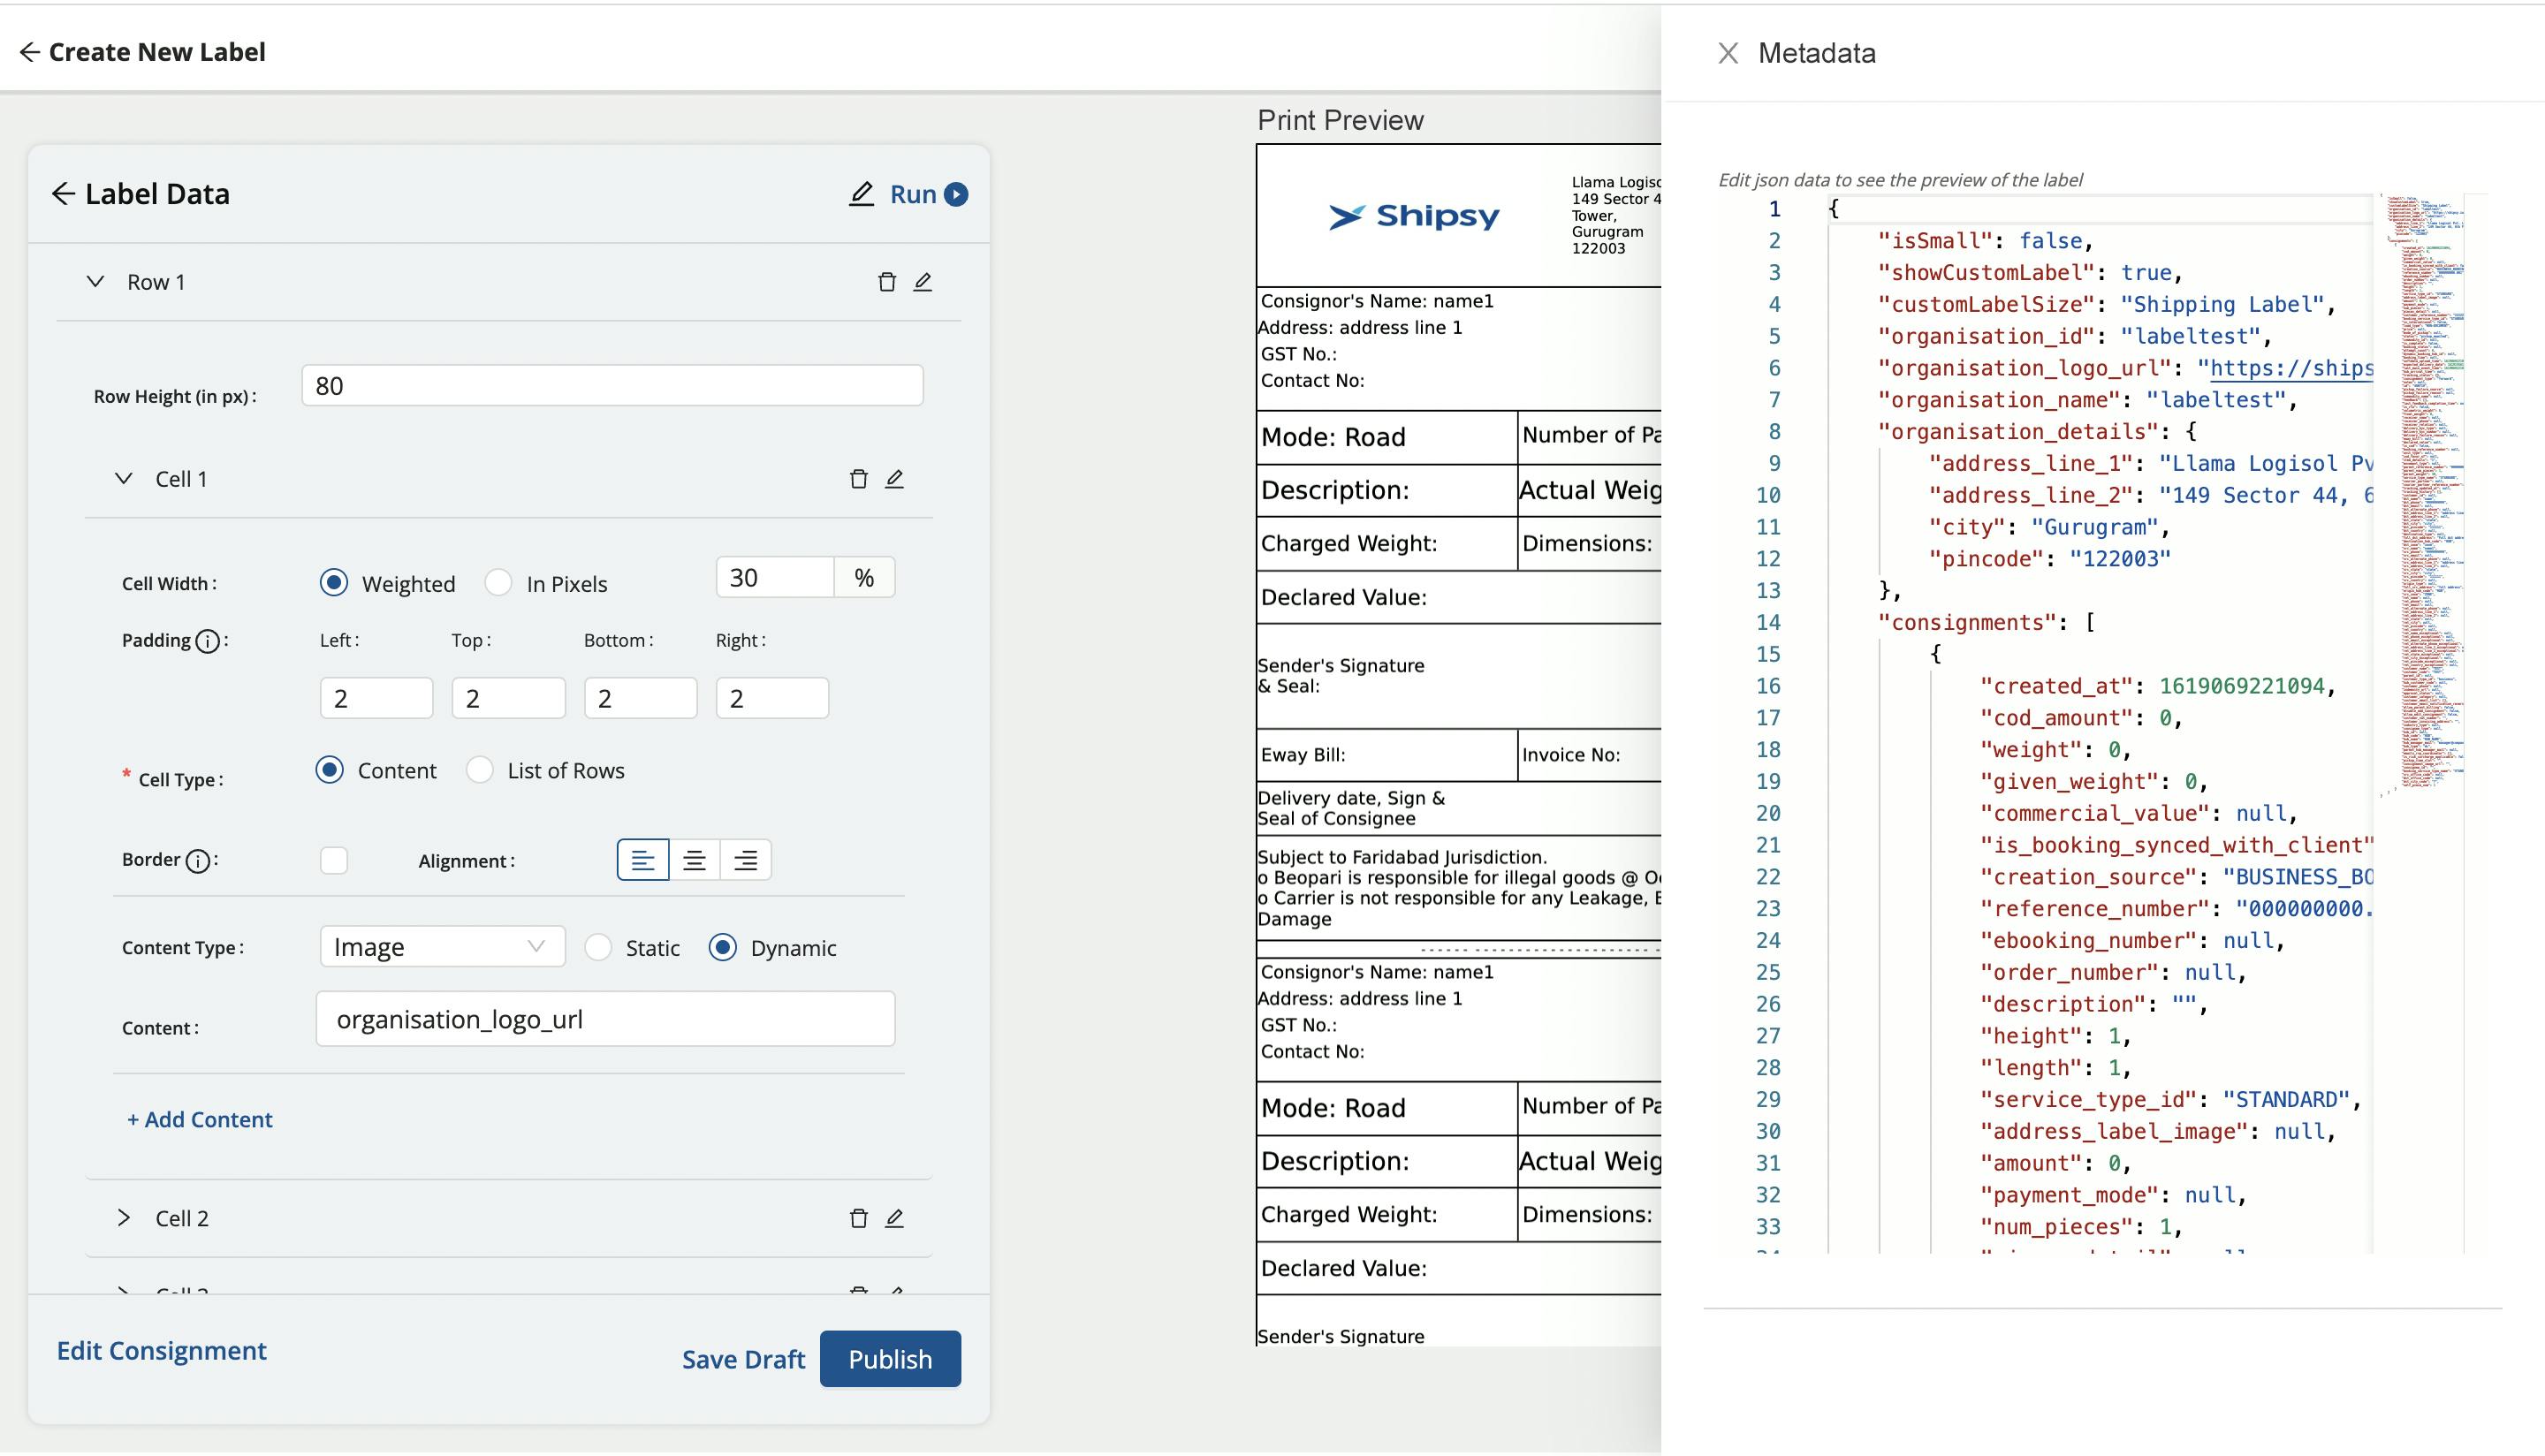
We use form functionality to create a label where everything ranging from page size to padding, and static to dynamic label contents are generated without coding.
The dynamic preview of the label being made is also shown to show the liver rendering of the recent changes or actions, as shown in the following image:
Source: Shipsy
Further, the default consignment metadata is available on the sidebar to allow the developers easy access to the code as and when required.
This way, the dynamic content can be easily copy-pasted from the metadata to the form elements, and the label generation becomes easier.
While this process solved the code-free nature of the label generation process, two challenges were still there:
- It was an infinitely going-on form
- As form rendering is a resource-intensive process, re-rendering a long-form could easily render the page unresponsive
These challenges were resolved in the next step.
Step 5: Optimizing the Form Performance
We optimized form performance by breaking down the form components into different parts and made pure functions for these components.
Thus, the value of the component now remains the same unless the properties are changed. This means that unless the properties of a form component are changed, the values are returned from the cache by React
Memo and the form components are not re-rendered.
Hence, there are no performance issues as well.
Step 6: Printing the Label From Dashboard
Finally, once the label is ready, it can be saved and published in the dashboard. The print command can be given from the dashboard and any user can easily generate the labels without having to code.
The PDF of the label is generated on the server side and sent to the client as a blog. The client can view and print the label as and when required.
To prevent different people from editing a label concurrently, we have a uniqueness check for versioning.
The versions are stored in the history and can be used to override the changes.
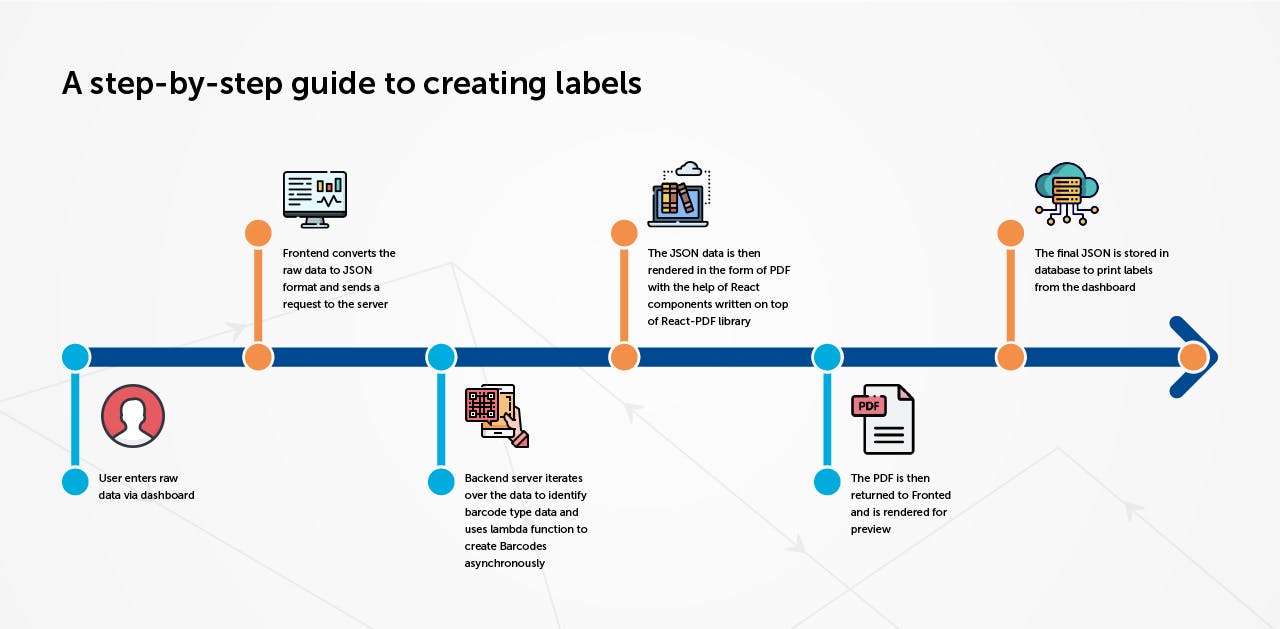
An overall walkthrough of the entire process is shown in the following image:
Source: Shipsy
Results: Benefits We Gained via Code-Free Label Generation
Arresting such redundancies can optimize the processes and spur a number of benefits. Some of the benefits we unlocked via this endeavor include:
1. Speedy Label Generation
As the process no longer involves redundant and repetitive coding, the label generation has become faster, easier, and hassle-free.
Previously, it took 2 days to generate a single label. Using code-free label generation has reduced the label generation time to 2 hours!
2. Faster Onboarding of Customers
Fast and efficient label generation has reduced the operations kick-start time by 1.5 days.
The customers can get started with the label generation process without any specific learning involved. The dashboard is extremely intuitive and the UI components are self-explanatory with captions being shown with a hovering cursor movement.
3. Save Drafts for Quicker Updates
The multiple drafts generated by a user can be saved for future use and updates. This reduces the overall time and effort spent in generating labels.
Shipsy is a community of agile developers consistently working towards the improvement of our products, and underlying tech to ensure performance-intensive business deliverables.
We hope this write-up energizes similar efforts across the developer community.
To become a part of our developer community, please visit the Careers Page.
Acknowledgments and Contributions
As an effort towards consistent learning and skill development, we have regular “Tech-A-Break” sessions at Shipsy where team members exchange notes on specific ideas and topics. This write-up stems from a recent Tech-A-Break session on code-free label generation, helmed by Shivangi Singla and Sumit Gupta.

