
Let’s Play! - Building ECS-EC2 Sandbox for Cost-Efficient Testing at Scale
Shipsy's Dev Team builds ECS-EC2 Sandbox to scale UAT testing and unlocks 70% cost savings.

When products and teams are relatively smaller, using a single staging environment for UAT works fine. We can easily sync what specific code is being deployed and easily test the staging environment to ensure everything works as expected.
However, as teams and products scale, managing a single staging environment becomes complex.
Multiple features being tested on a single staging environment might see different behavior in production when one of them goes into production. Finding the root cause of bugs becomes harder and ensuring that new code wouldn't conflict with the current state of the staging environment becomes a daunting task, as shown in the following image:
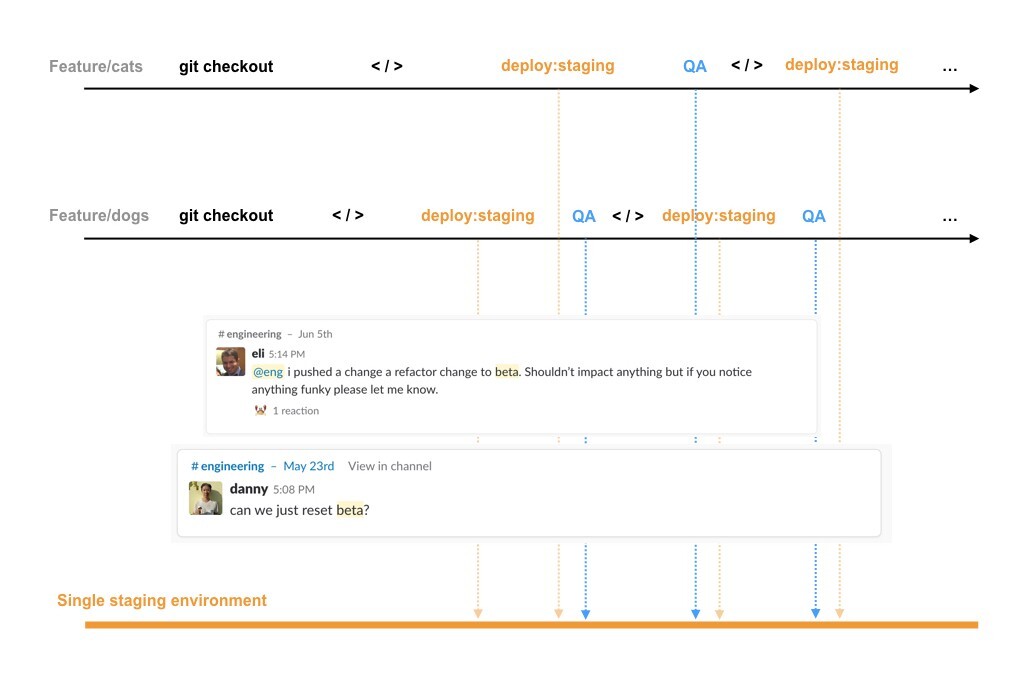
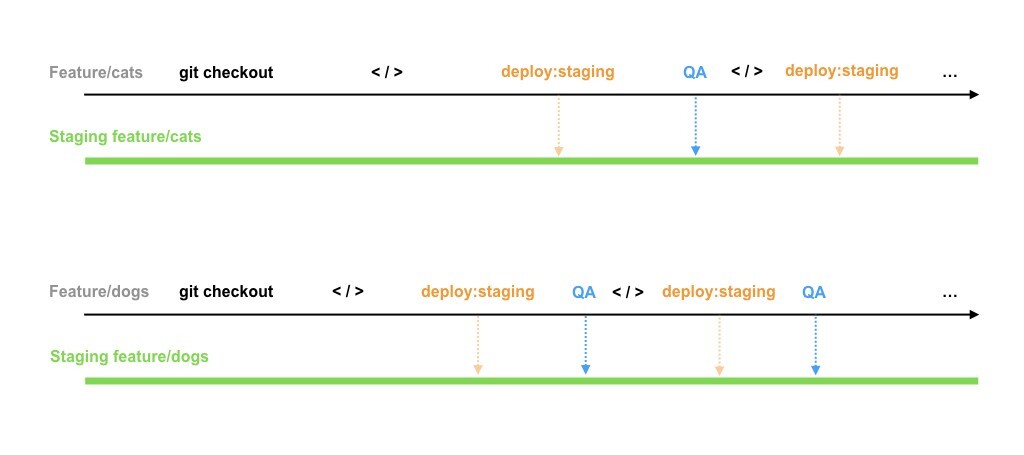
Hence, it becomes important to create feature-specific disposable testing environments that are cost-efficient, scalable, easily manageable, and robust.
Here is how we, at Shipsy, built an ECS-EC2 Sandbox for UAT testing at scale and unlocked up to 70% of cost savings at the same time!
Sandbox - Design, and Architecture
A sandbox refers to a testing environment that isolates the production environment from untested code changes and direct experimentation.
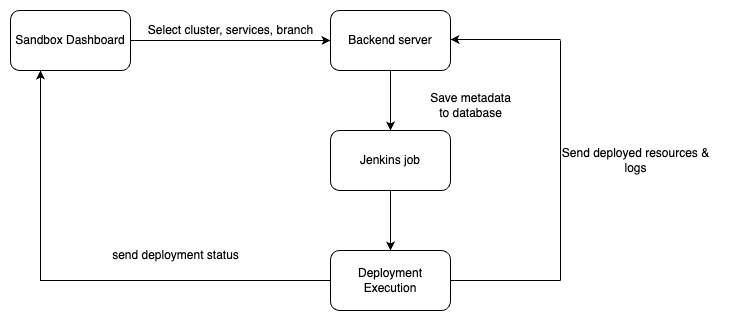
The entire cluster, config files, branches, services, etc., are selected from the Sandbox dashboard, and this entire data goes to the backend server once the user clicks on the deploy button.
This data deployment kicks two actions - the entire data gets stored in the database and the backend server triggers a corresponding Jenkins Job that triggers the deployment script over the SSH.
Once the Jenkins job gets executed, it sends the build URL and updated deployment log to the database for visibility over the front end.
Configuring AWS Resources
We used the following AWS resources for Sandbox deployment:
Amazon ECS
Amazon ECS is a fast and highly scalable container management service that can be used to run, stop, and manage containers on a cluster. We use it for application deployment and scaling.
ECR
It is the storage of docker images on AWS. ECS pulls images from ECR to deploy.
ALB (Application Load Balancer)
We use the application load balancer to distribute incoming traffic among EC2 instances.
Security Group
This is used to control incoming and outgoing traffic for our EC2 instances.
DNS & Load Balancers
The Domain Name System (DNS) turns domain names into IP addresses, which browsers use to load internet pages.
Load Balancer acts as a reverse proxy and distributes the incoming traffic across multiple targets, such as EC2 instances, containers, and IP addresses.
We have a specific domain name convention that we have optimized for our use case:
https://<sandbox-name>.<service-name>.shipsy.io
We have also created a wildcard subdomain in AWS Route 53, where our DNS zone is present:
*.demoprojectxsandbox2.shipsy.io
This DNS record is mapped to its corresponding application load balancer DNS name. Then the load balancers forward the request to AWS Target Group using HTTP/HTTPS listener rules.
HTTP/HTTPS listener rules examples:
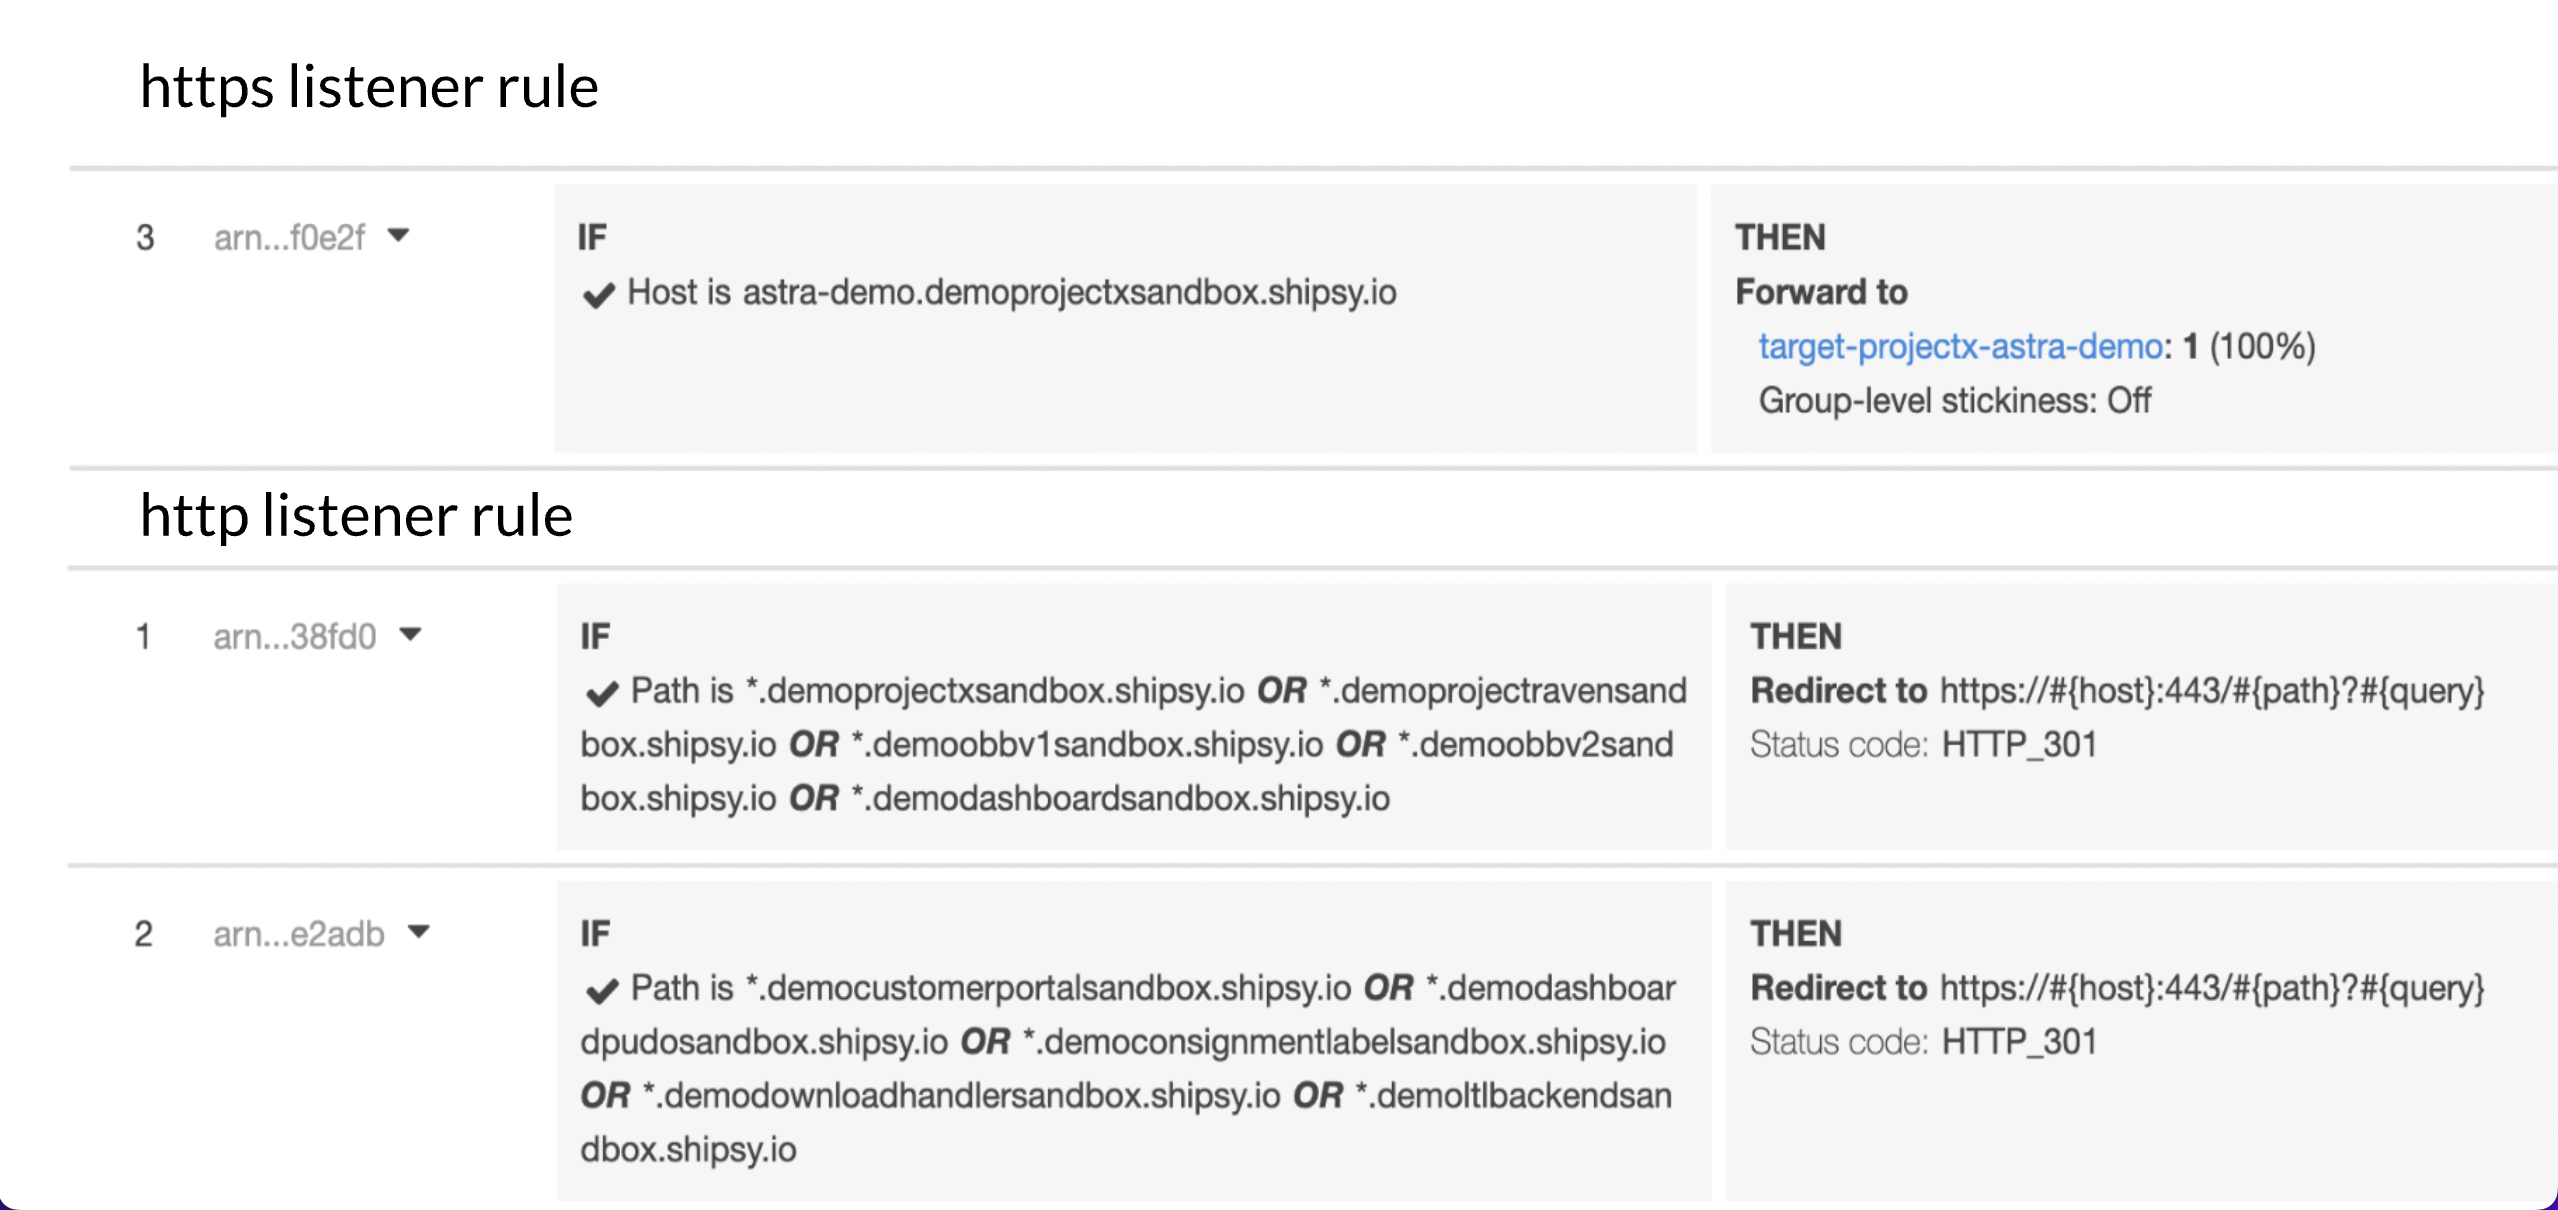
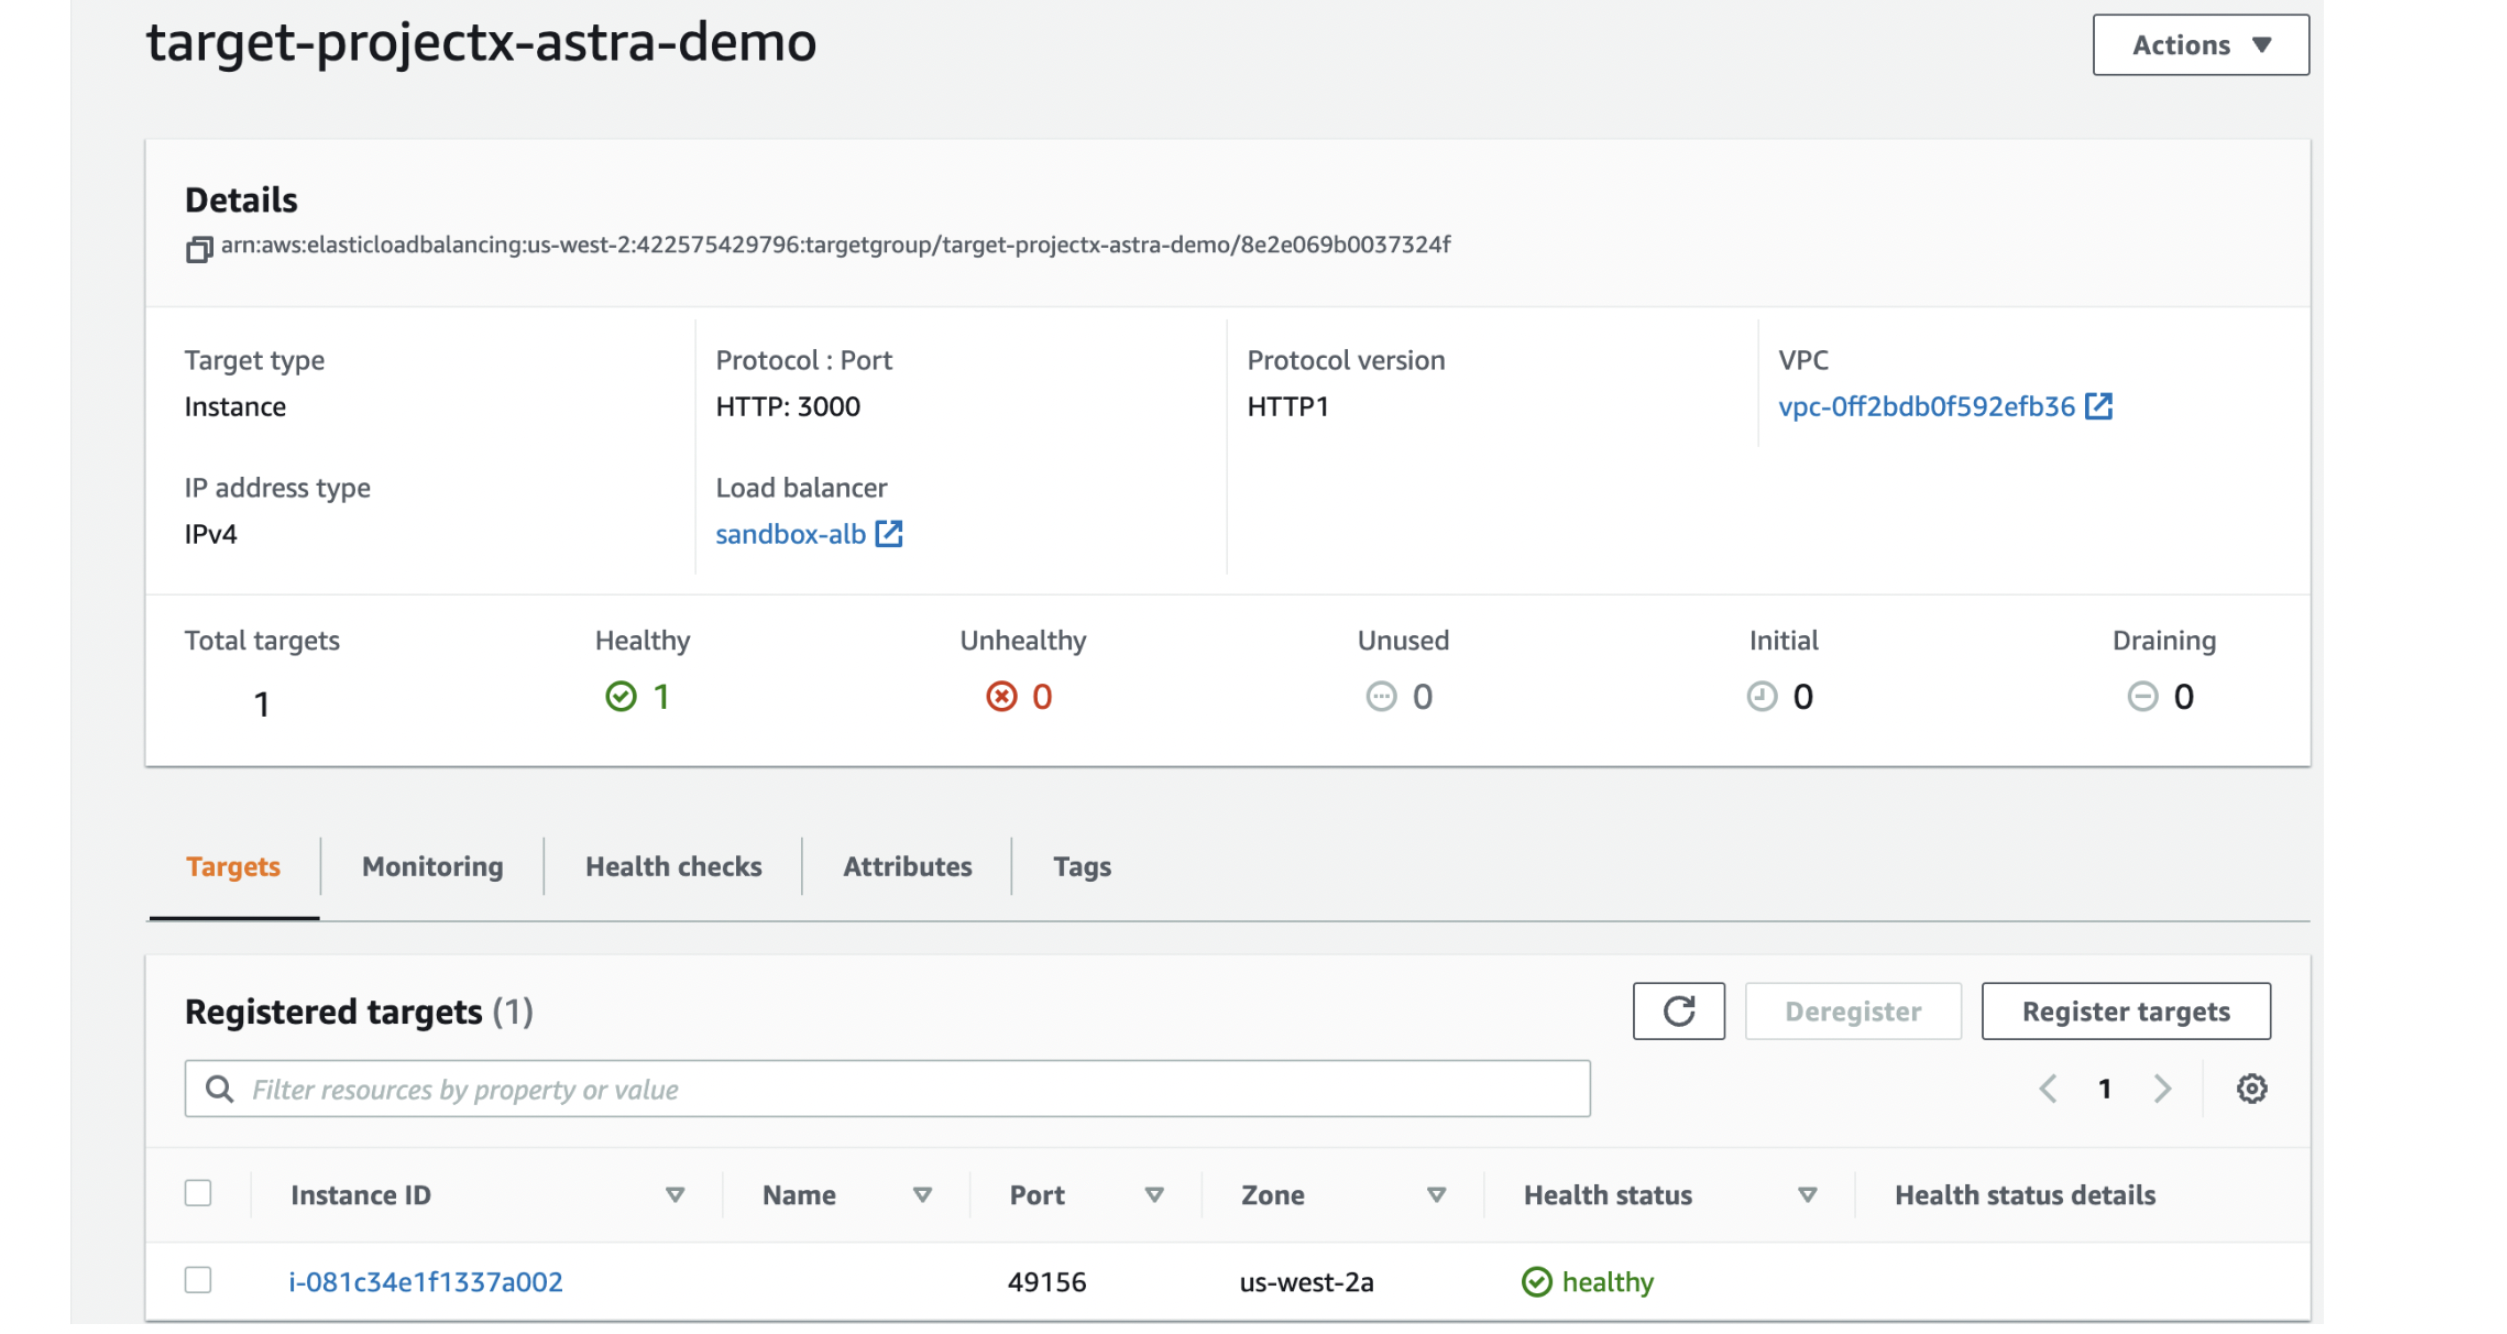
Next, we use the Target Group to route requests to one or more registered targets, in our case EC2 instances. This Target Group has all the information such as the IP address of the EC2 instance, port, health check status, etc.
Load balancers have a listener rules limit and we have set the number of load balancers for our demo sandbox according to our use case.
The entire conversation flow goes like this:
DNS record → Application Load Balancer → Target Group → EC2 instance → Container
Take a look at the following image for a better understanding:
Deployment - Behind the Scenes
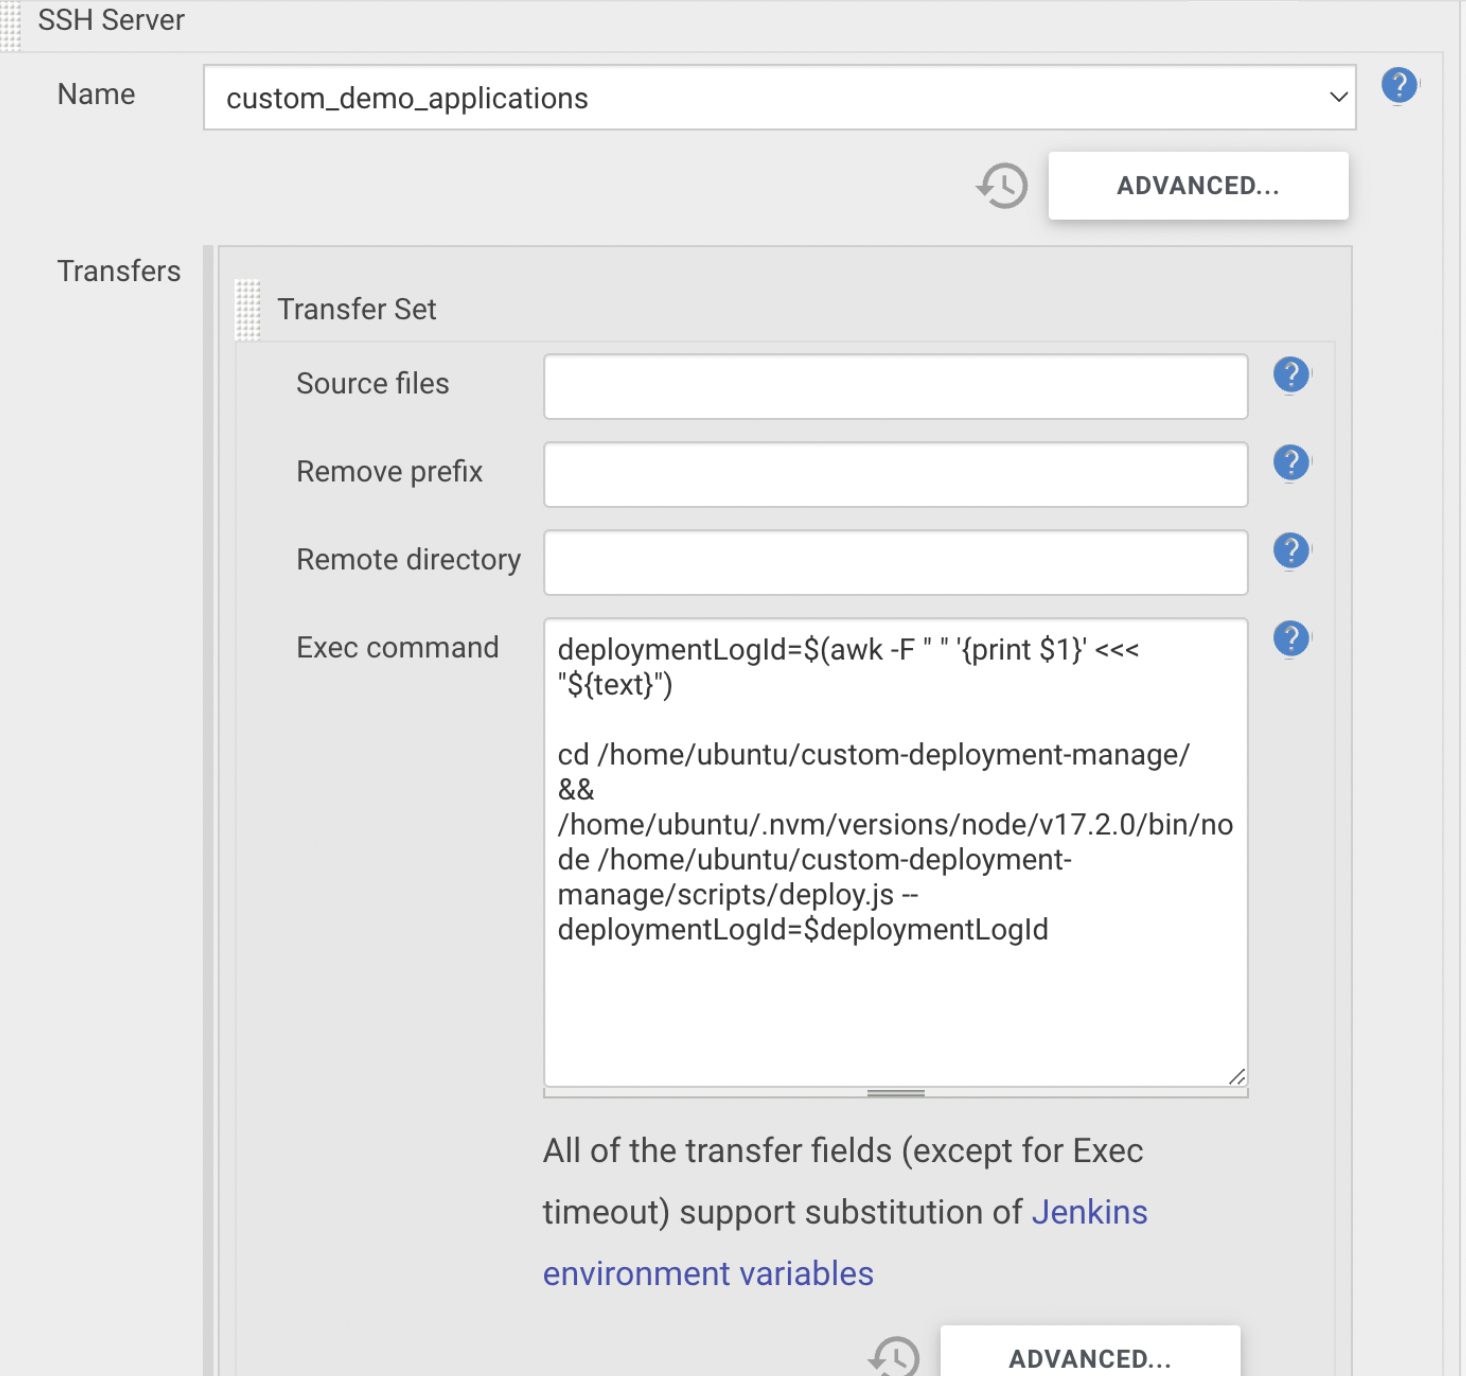
We have already mentioned that the backend server inserts user deployment data into the database and triggers Jenkins job with the parameter - newly created demo deployment log id.
Then, the Jenkins Pipeline executes the deployment script over SSH with the parameter - recently received log id, so that we can fetch necessary user deployment data from the database.
Next, we discuss the deployment script steps in detail.
1. Generate Code Folder
Here, we are generating the code folder in two ways:
- We clone the repository for an entirely new deployment
- We pull the latest custom branch of that repo in case of redeployment
const codePath = `${branchPath}/code`;
 if (!fs.existsSync(codePath)) {
   fs.mkdirSync(codePath);
   shellChangeDirectory(codePath);

   try {
     console.log(
       `git clone git@${repository}:shipsy/${repository}.git ${codePath}`
     );
     shellExecuteCommand(
       `git clone git@${repository}:shipsy/${repository}.git ${codePath}`
     );
   } catch (e) {
     throw `Couldn't clone the repository`;
   }

   try {
     shellChangeDirectory(codePath);
     compareProdLatestCommitWithCustomBranch(repository, branch);
     shellExecuteCommand(`git checkout ${branch}`);
   } catch (e) {
     if (e === errorCheck.HEAD_COMMIT_NOT_FOUND) {
       try {
         console.log(
           `Branch not up to date, trying to auto pull ${prefillDefaultBranch[repository]} branch`
         );
         shellExecuteCommand(
           `git pull origin ${prefillDefaultBranch[repository]}`
         );
         shellExecuteCommand(`git push origin ${branch}`);
         console.log(`Auto pull and push succeeded!`);
       } catch (err) {
         try {
           shellExecuteCommand(`rm -rf ${branchPath}`);
         } catch (error) {
           throw `Invalid branch ${branch}`;
         }
         throwErrorMsgForCommitDiff(repository);
       }
     } else {
       try {
         shellExecuteCommand(`rm -rf ${branchPath}`);
       } catch (e) {
         throw `Invalid branch ${branch}`;
       }
       throw `Invalid branch ${branch}`;
     }
   }
}
2. Generate Config Files
Here, the main challenge was ensuring individual service deployment with its correct config files which point to the deployed URL for deploying the entire cluster.
We overcame this by having the standard naming convention and by figuring out the number of rules needed for any deployment. We keep on looping through all the available sandbox load balancers and check for availability of all the rules in this single load balancer.
Hence, now we know that all the services are to be deployed on the same load balancer and we can easily predict the generated domain name for all services.
if (rulesNeeded !== 0) {
     for (const [index, arn] of httpsListenerARNs.entries()) {
       // taking lock on current alb and increment reserved rules
       const { existingRulesReserved } = await updateReservedRules(
         deploymentLogId,
         arn,
         rulesNeeded,
         "increment"
       );

       const httpsListenerRuleLimitExceeded = await isListenerRuleLimitExceeded(
         {
           loadBalancerClient,
           listenerARN: arn,
           rulesNeeded: existingRulesReserved
         }
       );

       console.log({ httpsListenerRuleLimitExceeded });

       if (!httpsListenerRuleLimitExceeded) {
         httpsListenerARN = arn;
         sandboxEnvIndex = index;
         break;
       }

       // no need to reserve rules in current alb if limit is already exceeded
       await updateReservedRules(
         deploymentLogId,
         arn,
         rulesNeeded,
         "decrement"
       );
     }
   }
generateUrl() Function generates the predicted domain name of the service based on the sandbox environment name and available load balancer index.
function updateCourierTrackingConfigDependencyURLs({
 sanitizedEnvironmentName,
 configSourcePath,
 fileName,
 sandboxEnvIndex,
 sandboxResourceMap,
 servicesPresent
}) {
 const projectXBaseUrl = `https://${generateUrl(
   "projectx",
   sanitizedEnvironmentName,
   servicesPresent,
   sandboxResourceMap?.["projectx"]?.["sandboxEnvIndex"] ?? sandboxEnvIndex
 )}`;
 const ltlBaseUrl = `https://${generateUrl(
   "ltl-backend",
   sanitizedEnvironmentName,
   servicesPresent,
   sandboxResourceMap?.["ltl-backend"]?.["sandboxEnvIndex"] ?? sandboxEnvIndex
 )}`;

 const applicationConfig = fs.readFileSync(
   `${configSourcePath}/${fileName}`,
   "utf-8"
 );
 let parsedApplicationConfig = JSON.parse(applicationConfig);
 parsedApplicationConfig["PROJECTX_BASE_URL"] = projectXBaseUrl;
 parsedApplicationConfig["ltl_base_url"] = ltlBaseUrl;

 fs.writeFileSync(
   `${configSourcePath}/${fileName}`,
   JSON.stringify(parsedApplicationConfig),
   "utf-8"
 );
 return JSON.stringify(parsedApplicationConfig, null, 4);
}
Here, we faced another challenge: Since we are checking the availability of rule limits at the start of the script. What will happen in case of concurrent sandbox deployments?
We overcame this challenge by storing the data required by the rules in the database for each load balancer and have taken the lock in the database row. Now, the concurrent sandbox deployments cannot take the lock to the same load balancers simultaneously, thereby avoiding the race condition.
3. Create & Register Task Definition
A Task is a running container and its settings are defined in the Task Definition. This task definition is required to run Docker containers in Amazon ECS.
function getCourierTrackingDefinition({
 repository,
 sanitizedEnvironmentName,
 imageTag
}) {
 return {
   containerDefinitions: [
     {
       name: `courier-tracking-${sanitizedEnvironmentName}-container`,
       image: `${ecrURI}/${repository}:${imageTag}`,
       essential: true,
       logConfiguration: {
         logDriver: "awslogs",
         options: {
           "awslogs-group": "/ecs/demo-courier-tracking-ec2-task",
           "awslogs-region": "us-west-2",
           "awslogs-stream-prefix": "ecs"
         }
       },
       portMappings: [
         {
           hostPort: 0, // port will be assigned when task is fired up
           protocol: "tcp",
           containerPort: repositoryContainerPort[repository]
         }
       ],
       cpu: "256",
       memory: "512"
     }
   ],
   family: `courier-tracking-${sanitizedEnvironmentName}-ec2-task`,
   requiresCompatibilities: ["EC2"]
 };
}
4. Create Target Group
Next, we created target groups from the script:
const createTargetGroup = async ({
 loadBalancerClient,
 repository,
 sanitizedEnvironmentName
}) => {
 return new Promise((resolve, reject) => {
   const params = {
     Name: `tg-${repositoryTargetGroup[repository]}-${sanitizedEnvironmentName}`
       .substring(0, 32)
       .replace(/-\s*$/, ""), // target group can not have more than 32 characters
     Port: repositoryContainerPort[repository],
     Protocol: "HTTP",
     VpcId: VPC,
     HealthCheckPath: repositoryHealthCheckMapping[repository]
   };
   console.log(params);
   loadBalancerClient.createTargetGroup(params, (err, data) => {
     console.log(err, data);
     if (err) {
       reject(err);
     }
     resolve(data.TargetGroups[0].TargetGroupArn);
   });
 });
};
5. Add Listener Rules to Load Balancer
The listener rules are created dynamically from the script, and an example is shown below:
const addHTTPSRuleToListener = async ({
 loadBalancerClient,
 listenerARN,
 priority,
 hostHeader,
 targetGroupARN,
 pathPatterns = []
}) => {
 return new Promise((resolve, reject) => {
   const params = {
     Actions: [
       {
         TargetGroupArn: targetGroupARN,
         Type: "forward"
       }
     ],
     Conditions: [
       {
         Field: "host-header",
         Values: [hostHeader]
       },
       ...pathPatterns
     ],
     ListenerArn: listenerARN,
     Priority: priority
   };
   loadBalancerClient.createRule(params, (err, data) => {
     if (err) {
       reject(err);
     }
     resolve(data?.Rules[0].RuleArn);
   });
 });
};
6. Create & Deploy Service
We use an Amazon ECS service to run and maintain a specified number of instances of a task definition simultaneously in an Amazon ECS cluster.
function getCourierTrackingServiceParams({
 cluster,
 taskDefinition,
 repository,
 sanitizedEnvironmentName,
 targetGroupARN
}) {
 return {
   cluster,
   taskDefinition,
   serviceName: `courier-tracking-${sanitizedEnvironmentName}-service`,
   loadBalancers: [
     {
       targetGroupArn: targetGroupARN,
       containerName: `courier-tracking-${sanitizedEnvironmentName}-container`,
       containerPort: repositoryContainerPort[repository]
     }
   ],
   desiredCount: 1,
   role: "ecsServiceRole"
 };
}
Now that we have created a sandbox, we need to make sure that the entire undertaking stays cost-efficient as well.
On-Demand vs Spot Instances: Cost Considerations
There are two types of instances - on-demand instances (default) and spot instances. The on-demand instances come with no long-term commitment and can be availed anytime you want them. However, this availability comes at a higher price.
For us, daily sandbox deployments sit around 40, of which 10 are completely new deployments. The number of active container instances is 150 and active running branches are 470.
So, on-demand instances amounted to $445.04 per month.
Spot instances, on the other hand, can be availed of via a bidding system. There is a maximum bid price and by paying more than that, you can use the instance if there is free capacity.
Once the free capacity gets exhausted, or the current bid price goes higher than your maximum bid price, your spot instance is terminated.
By using these spot instances, we were able to reduce the monthly billings to $133.72, which meant 70% cost savings.
However, this came with another challenge - no default instance termination warning from Amazon. Whenever a spot bid price exceeds your bid or free capacity gets exhausted and the instance can get terminated even when you are in the middle of deployment.
We addressed this via two-pronged approach:
- Notification before instance termination
- Ensuring instance availability for interruption-free working
1. Notifications
Whenever an Amazon instance terminates, it goes into a Draining state, during which no new tasks can be placed on the instance. Now, we used the following shell script to set these notifications into action:
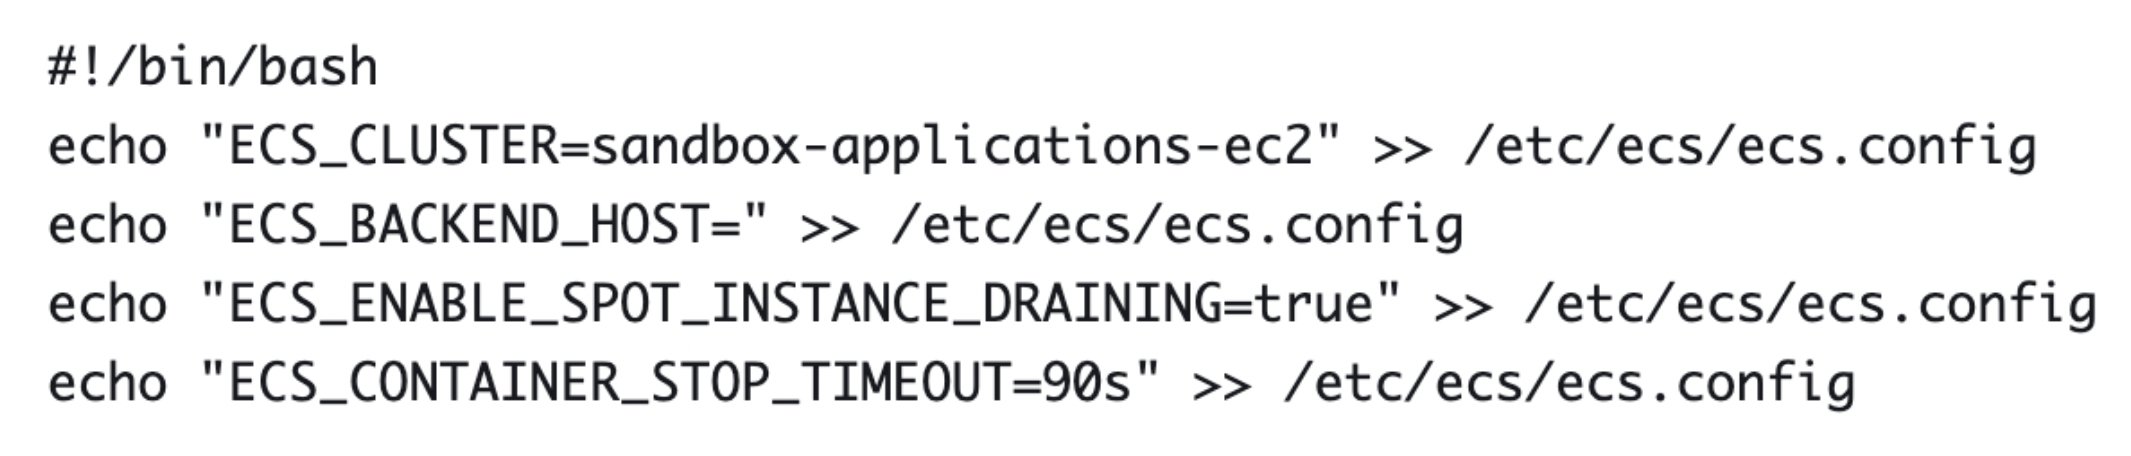
The command “instance_draining_true” is launched right after getting an instance. Now, as soon as the instance gets in the draining state, the script starts putting the tasks on another EC2 instance to avoid downtime and kicks a buffer period of 2 minutes to ensure no work gets lost.
2. Ensuring Instance Availability
To ensure that we have extra EC2 instances available, we make use of Spot Fleet. A Spot Fleet is a collection of multiple EC2 instances of almost similar configurations that we can choose during the ECS cluster configuration, as shown below:
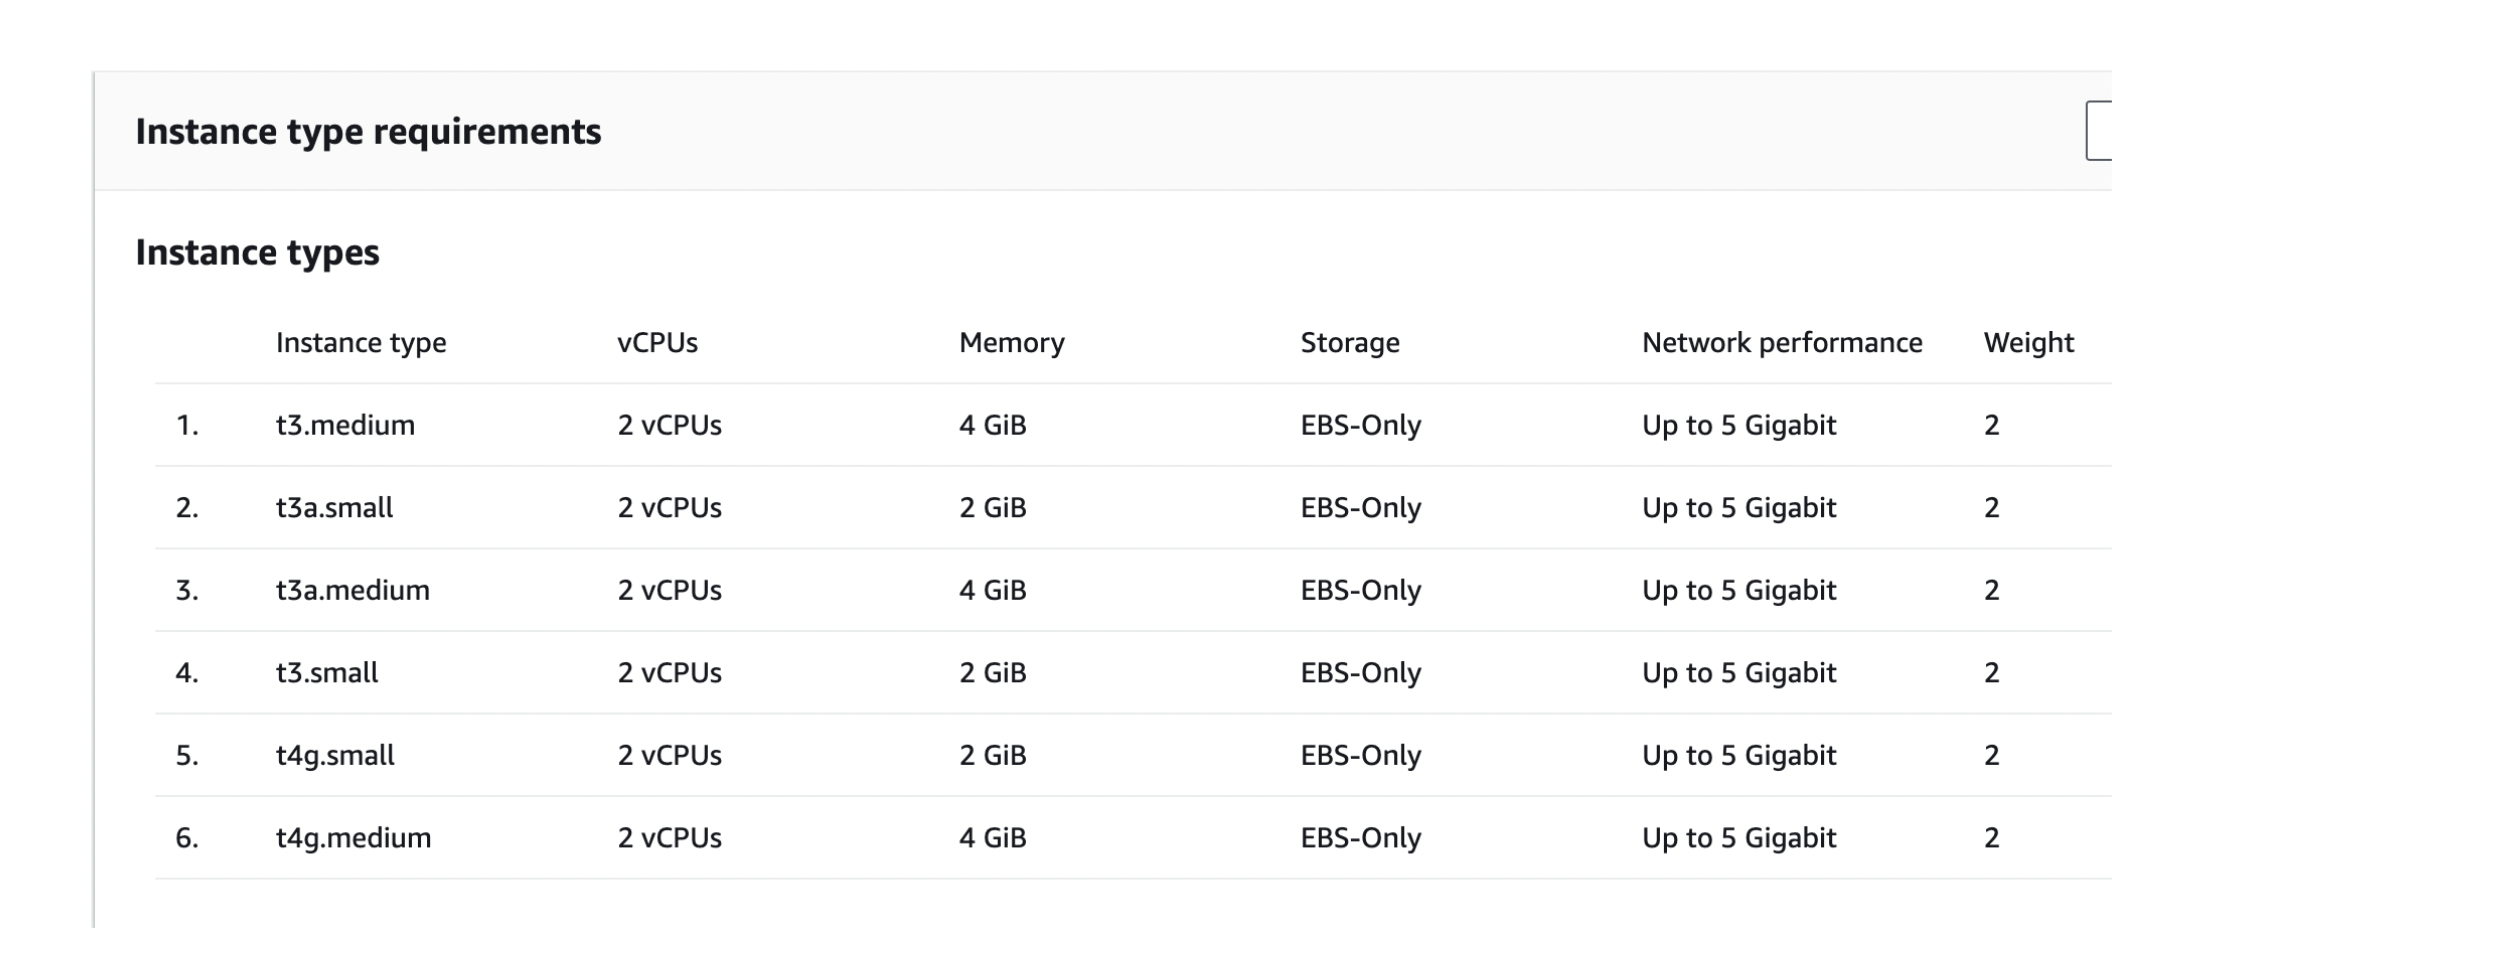
By doing so, we ensure that EC2 instances are available when one of them goes into a draining state, and the probability of getting the instances of almost similar configuration is also increased.
Further, we have configured a specific threshold value for auto-scaling and auto-downscaling of instances in case the instance capacity utilization increases or decreases.
3. Scaling Testing Operations with Cost Efficiency
In an agile organization like Shipsy, operational scaling, especially in testing comes with numerous critical core considerations, of which robust performance and cost efficiency are of paramount importance. With spot instances, we were able to scale our UAT testing in a smart and reliable manner, all the while reducing the testing costs to 90%.
At Shipsy, we have a highly agile and innovative tech community of developers committed to making logistics and supply chain processes better, sharper, and more efficient with code that gets better every day!
If you wish to be a part of Team Shipsy, please visit our Careers Page.
Acknowledgments and Contributions
As an effort towards consistent learning and skill development, we have regular “Tech-A-Break” sessions at Shipsy where team members exchange notes on specific ideas and topics.
This write-up stems from a recent Tech-A-Break session on demo Sandbox, helmed by Viraj Shah and Semal Sherathia.